Easy Peach Jam with a Kick………………………..

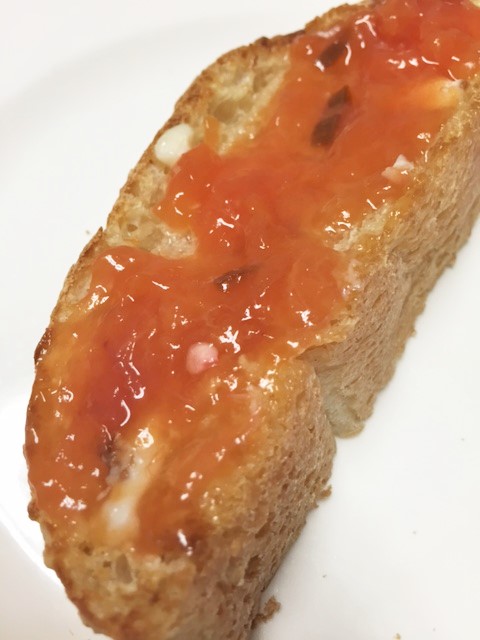
I have never really had the desire to can my own fruit or veggies. Seems like a lot of work. But I wanted a good homemade peach jam. I love a good peach jam. This one is super yummy, super easy and there is no canning involved. YAY! Plus, I was able to control the sweet factor. Often times, the store bought jams are just too sweet for me. Now, this peach jam has a real kick. I added serrano chiles. Wait!! don’t go away……keep reading. Don’t wrinkle your nose…..If you like heat at all, you will love this. Or even if you don’t, surely you must know someone that you would love to make this for. Right? You don’t have to make it real hot. I didn’t. After all, I really wanted to taste the peachy-ness. It’s great to serve over a block of cream cheese with some crackers, or with some brie cheese…or on toast….or on ice cream…..orrrrrrr you can even add a bit of soy sauce and serve it with chicken or fish. See there? Sounds good, huh? Let’s get started…..

peachserranojam4 peachserranojam5

peachserranojam6 peachserranojam

peachserranojam8

Peach Jam with a Kick

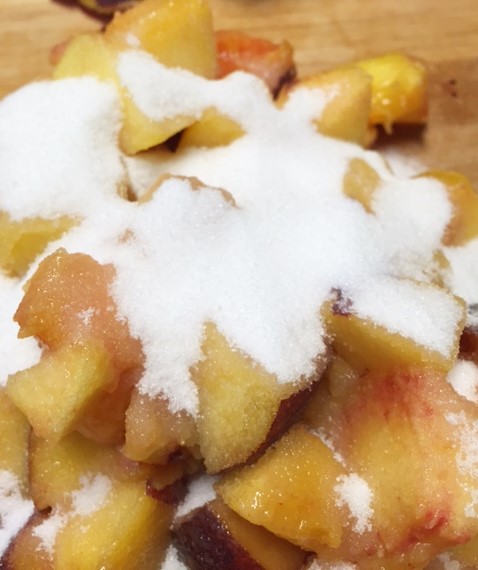
4 ripe yellow peaches (peeled and chopped)
1  c. sugar (if peaches aren’t real sweet, use 1 ¼ cup)
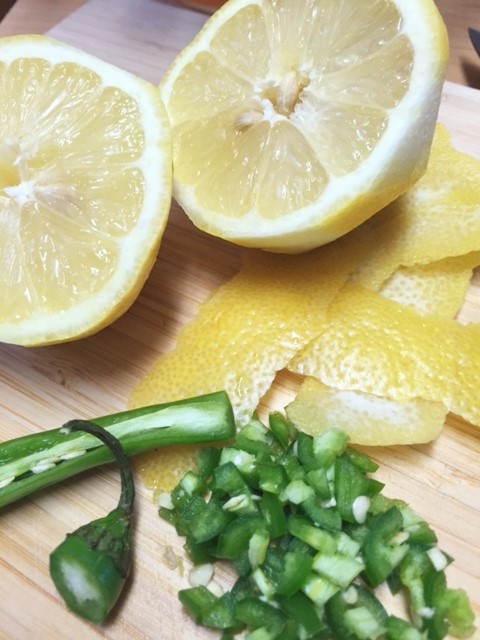
1 small jalapeno or serrano chile, minced (use more or less, depending on your heat preference.)
3 strips lemon peel
2 tblsp. fresh lemon juice
1/2 tsp. salt

In a bowl, toss peaches and sugar together. Pour into a strainer and allow  to sit like that for 20 minute. I save the juices for my ice tea.

In a saucepan, over medium heat,bring peaches, jalapeño, lemon peel and juice, and salt to a  bubble. Lower the heat to a simmer for about 20 minutes. With a fork, mash fruit, leaving it a bit chunky. Discard  the lemon peel.    Spoon the mixture into a jar. Chill.

Makes about 2 cups of jam.

Serving suggestions:

  • On toast
  • I add a tsp of soy sauce to a bit of jam and spoon over chicken or fish
  • On ice cream
  • On top of some brie cheese and served with crackers
  • On shortbread cookies


Make your own Tahini…….

You know how I’ve mentioned my weird food-word association? If it sounds weird, I jes aint gonna eat it. I don’t even know when this all started……..but it was way back.

As I have mentioned before, it took me forever to try HUMMUS. I hate that word. So I usually stick to calling it BEAN DIP. Well, a key ingredient in HUMMUS, is another word that really bothers me…..TAHINI. OMG, what is it about that word that is so annoying!!!! Now, I know that it is just some smashed up sesame seeds, but come onnnnnn……TAHINI?? It’s just weird. It’s also a bit pricey, considering it’s just a bunch of smooshed up sesames seeds and some oil. Plus, you have to buy a big ol jar and it goes bad quickly. So, I thought I would make my own. You can make just what you need every time you crave that “H” word.

So, all you need is some toasted sesame seeds and some olive oil. That’s it.

hummusT7 hummusT4

hummusT3 hummusT6

Tahini

1 cup of sesame seeds, toasted and warm
1  1/2 tablespoon of olive oil

Toast the seeds in a skillet on medium heat. Move them around because they burn easily. Remove from pan as soon as they start turning brown. Put them in a food processor or a good blender. Give them a good blitz….3 or 4 times until you have a pretty fine powder. Then add the olive oil and give it another blitz or 2 or 3 times. If you need to add a wee bit more oil, do so until you get a nice smooth paste. If it doesn’t look ultra smooth, don’t worry about it. It will be fine. That’s it. Too easy. Store it in a jar until you’re ready to use it.

Here is a Hummus recipe

Hummus (or Bean Dip)

1 16 oz can garbanzo beans
1/4 cup of the liquid from the can of garbanzo beans
2 garlic cloves
1 1/2 tablespoons tahini (Tahini is another word I hate.. just sayin)
2 tablespoons olive oil
1/2 teaspoon salt
2 tablespoons freshly squeezed lemon juice

Drain the garbanzo beans reserving the 1/4 cup and put all ingredients in a blender and blend on low speed, until smooth.  Pour it into a bowl, chill in the fridge for a couple hours to let the flavors meld.  Sprinkle with some paprika, I use cayenne pepper. Serve with warm pita or pita chips.


Blackberry Ice Cream…………

Ice Cream…..yes please. Love it. In all my years, I have only known 2 people who told me they didn’t like ice cream. We are no longer friends. Just kidding. So I’ve mentioned Tillamook ice cream in previous posts. When I toured the Tillamook plant in Tillamook, Oregon, a few months ago, I had a scoop of the Wild Mountain Blackberry ice cream. I wanted to march back to the production area where they make ice cream, and jump into a huge tank of this stuff. It was so good. I know there are a few stores in my area that carry Tillamook ice cream, so I was so excited to buy some. But ohhh, big sigh…..I haven’t been able to find this particular flavor. Sooooooo, I made my own. I must say, it’s every bit as good…..sorry Tillamook.

Blackberries are delicious and their flavor is very pronounced…blackberry ice cream can have a more subtle taste, but it smells incredible. I would happily dab a little bit behind each ear! hahahahah. I love this stuff. Now, you can use frozen blackberries, but fresh is so much better.

blackberryicecrm             blackberryicecrm2

blackberryicecrm3           blackberryicecrm4

blackberryicecream5

Blackberry Ice Cream

2 cups fresh blackberries
1 1/4 cups sugar
juice of  half a lime
1 1/4 cups half-and-half
1/4 cup whole milk, NOT non fat…I mean, whats the point when you’re using all that cream, right? 🙂
5 egg yolks
1 1/2 cups heavy cream

In a sauce pan, mix the blackberries, lime juice and ¼ cup of the sugar together. Just heat long enough to break up the berries. Use a potato masher or fork, to help. Remove from heat.  At this point, if you dont like the little seeds in blackberries, you can strain the juice/syrup from your berries, or you can use all of the berries, seeds and all, which is what I prefer. All those bits of fruit….yum. If you’re going to strain the fruit, just press the berries against the strainer to extract as much juice as you can. Set aside.

In another saucepan, whisk the egg yolks and the remaining 1 cup of sugar together, into a paste. Whisk in the half and half and milk  and cook on medium heat, STIRRING CONSTANTLY, until slightly thickened. If you see bits of egg, be sure to strain the mixture into a bowl. You don’t need scrambled eggs in your ice ceam. Allow to cool slightly.

In a large bowl, mix the berries (or juice), heavy cream and egg/half and half mixture together.  Cover and chill overnight. It has to be really cold. When ready, stir your mixture and pour it into an ice cream maker. Let it churn according to ice cream maker directions. Scoop thick mixture into a freezer proof container and freeze for at least 4 hours. Don’t forget to lick the ice cream paddle. 🙂


Creamy Chocolate Cheesecake

I’m not a huge cheesecake fan. If I do eat it, it has to be creamy…not the drier kind you usually find in restaurants and bakeries. When I came across this recipe years ago, I knew with a couple of changes, it would be the perfect cheesecake. My favorite. Ever. My one and only. Devine. Cheesecake is really very easy to make. I think a lot of people are intimidated in making it, but it is easy, easy. I made this one for a friend awhile back. We were sitting there enjoying a slice and I was being my chatty self. She looked at me, with her eyes closed and said “shhhhh-hhhh…quiet please”. Of course I busted out laughing. She was just concentrating so hard on that cheesecake. When we were done, she said “can I buy the rest of that damned thing?” hahaahahaha. I wrapped it up for her and she left my house a very happy person. Of course, I didn’t charge her for it. But I think she would have paid good money for it. 🙂

Oh, and if you don’t have a spring form pan, you can make this in a baking dish.

Anyway, I hope you will make it and enjoy it as much as everyone else does.

  chocolatecheesecake4      chocolatecheesecake5                chocolatecheesecake2 chocolatecheesecake3

chocolatecheesecake

Creamy Chocolate Cheesecake

Crust:

2  cups of chocolate cookie crumbs
1/2 stick of butter (1/4 cup) melted

Mix the cookie crumbs and melted butter together. Press into the bottom of your pan and up the sides about a half an inch. Bake at 350 for about 5 minutes. Remove from oven and cool. Now, on to the filling……..

Filling:

3   8oz packages of cream cheese, softened to room temp
1   cup of sugar
3  eggs
1  cup sour cream, room temp
1  cup semi sweet chocolate chips, melted and room temp

In a mixing bowl with paddle attachment, mix the softened cream cheese for about a minute. Add the sugar, and mix till combined. Add the eggs one at a time, then the sour cream. Add the cooled melted chocolate, just till combined. Don’t over mix. Pour mixture into your cooled cookie crust. Place your pan onto a baking sheet. Bake at 350 for about 40 minutes,(don’t open oven door for at least 30 minutes) or until the top slightly jiggles when you give it a light shake. The top of the cheesecake should be dull looking. DO NOT OVERBAKE.
Allow to come to room temperature. Carefully remove the spring form pan. Now, on to the topping…

Topping:

3/4 cup sour cream or whip cream (I use sour cream)
chopped chocolate, cookie crumbs, berries…..

Give the sour cream a good stir. Spread it on the top of the cheesecake. Top with chopped chocolate, or whatever else you want. Chill overnight. YES, you have to wait till the next day. Trust me on this.


Taco Popcorn…..

I hesitated posting this. Just too simple. But I love this stuff so much, that I just had to share with ya’ll. Sharing is good.  You ever have those super lazy days? You don’t even want to leave the house? Nothing like curling up on the sofa with a big bowl of popcorn, watching a good movie. Who doesn’t like popcorn? This is a lazy day, simple snack. Although I do like popcorn made on the stove top….giving the pan a shake, shake, shake…..I always seem to burn it. RRRGHHHH. Oh and that yucky burned popcorn smell….blekh. I do like the microwaved popcorn, so that’s what I usually use. Although I have burned my share of that too. 🙂

So, sometimes I just want to kick up my popcorn a bit. This is one of my favorite popcorns. Taco popcorn. So super easy. I just use a packet of my favorite taco seasoning. Ranch dressing mix is also delicious. So, make some popcorn, put on a good movie and enjoy.

tacopopcorn2 tacopopcorn3

tacopopcorn1

Taco Popcorn

fresh batch of popcorn
– 1 packet of taco seasoning (don’t just dump the whole packet on, sprinkle to your taste)

Pop your corn. Immediately sprinkle on the taco seasoning. SO simple, right??

variations:

– use dry Ranch Salad dressing mix instead of taco seasoning
– instead of sprinkling on the dry seasoning, you can mix it with melted butter and drizzle it on your popcorn
– crush up some cheese doritio chips and toss with the popcorn
– sprinkle on some cinnamon and sugar

be creative!!!