Leftover, Leftover Turkey Rice Soup….

I hope you all had a wonderful Thanksgiving! Did you eat too much? I know I did! I cooked a 22 pound turkey for 4 people. Oh my…..I sent my daughter home with half of the leftover turkey and I still have tons! I’ve had turkey sandwiches, a complete leftover turkey dinner, turkey enchiladas and now I have made some turkey rice soup with green chiles and salsa.

I made the turkey enchiladas tonight. I sautéed some shredded turkey with green chiles and some onion and made too much. I tend to do that. Oops. So I made soup from my leftovers!

I think my favorite leftover turkey thing, is just a plain ol turkey sandwich on white bread, with mayo and salt and pepper. But tomorrow I shall enjoy this soup. Then I think I am DONE with turkey for a while.

What’s your favorite way to enjoy your leftovers? Tell me!


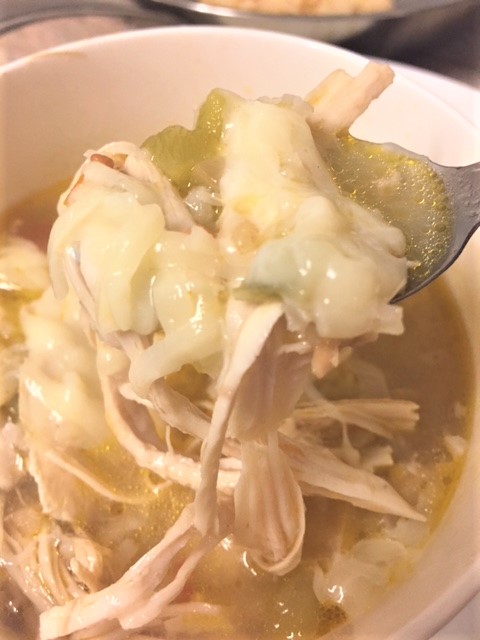
Sprinkled with a bit of Monterey Jack Cheese


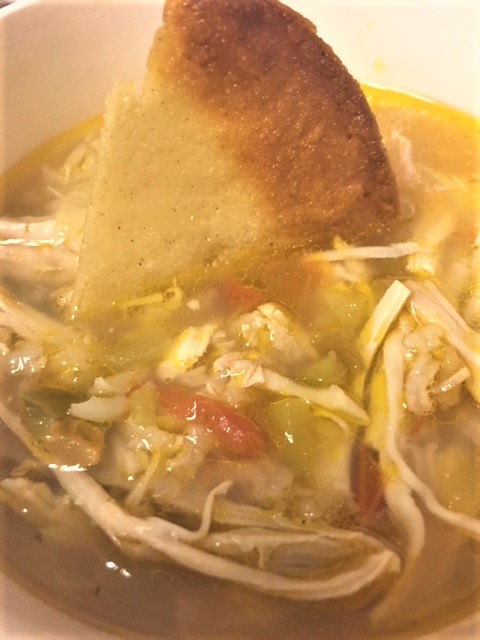
Turkey Rice Soup with Green Chiles

Adjust ingredient amounts to your liking, but here is what I did:

6 cups of water
approx. 2 cups of shredded turkey
approx. 1/2 cup green chiles, diced
1/2 cup salsa
salt and pepper to taste
1 cup cooked rice (if you don’t have cooked rice, add 1/2 cup uncooked rice. It will cook as your soup cooks)

Just dump everything in a pot. Add more or less of the ingredients, according to your taste.  Allow to cook for at least half an hour. If you are using uncooked rice, cook your soup until the rice is tender.

Sprinkle with a bit of shredded cheese.

Super Easy Cheesy Bread Roll ups…….

If you’re looking for a super easy and quick idea for rolls, this is it. What’s better than bread and cheese, right???? These rolls are so good and you could really do so much with these. I just like them plain, with some butter, but you can add some ham, pepperoni, jalapenos, eggs…..the possibilities are endless. I have even made a dessert version which were amazing. I will post those later.

Well, not much more to say. I think I will make some more. You too….go now. Go bake.


Easy Cheese Bread Roll Ups

Packaged/canned  crescent rolls
string cheese (is super easy) but any cheese will work
softened butter (optional)

Heat oven to 375.

Carefully separate and unroll the packaged dough. Brush with softened or melted butter. Place half of a cheese stick onto each roll. Roll it up starting from the wide side. Place on a baking sheet and bake for about 10 minutes or until brown.  That’s it!!!! Too easy right?

Now, use your imagination and try all different kinds of combinations:

pepperoni, sausage, ham, turkey
different cheeses
fruit that has been tossed with cinnamon and sugar
Green chiles and eggs

See what I’m talking about??? Go crazy!

Easy Gooey Pull Aparts from Canned Biscuits…..

You know that monkey bread pull apart dessert that we have all made at some point in our lives? You know…..the canned biscuits that you slam against the corner of your counter? I hate those frickin things. They scare the crap out of me every time! You would NOT want to see me opening one of those cans of biscuits. I turn my head, squeeze my eyes tight, grit my teeth and scream. Whyyyyyyyyyy must they make them like that!

Anyway, I guess it’s all worth the trauma, because what you get is a yummy sweet treat! Now, normally the biscuit is cut into quarters, dredged, etc. But I like to fan them out so to speak. I think it looks nicer….something a little different. In one of the pictures below, you’ll see that I slightly flatted a biscuit, and cut it in half. I did one square pan and one round pan that way. I also did one round pie dish, where I left the biscuits whole and did not flatten them.

For the round dish with the whole biscuits. you can flip it all out onto a plate, so that all the good is on top. But I actually like the look of the top sides . If you want to transfer them to a pretty serving platter, go ahead and flip them out of the baking dish, but them flip them again on the pretty serving platter. You can always drizzle goo all over the top. You could even do a white icing drizzle and maybe place a few fresh cranberries on top to make it look really festive!

This is such an easy thing to make and pretty inexpensive too.


Buscuits, slightly flattened, cut in half….rectangular dish


biscuits, slightly flattened, cut in half……round dish


biscuits left whole, not flattened…..round baking dish

  
right out of the oven………                                             flipped out onto a plate……………..(with nuts)


Flipped again onto a prettier plate rather than leaving in baking dish and drizzled with goo…………

Easy Gooey Pull Aparts

For 9×11 rectangle baking dish:
3 – 4 cans  biscuits (I used the Flaky layered kind)

For round pie plate, use
1 – 2 cans biscuits

Coating and goo:
1/3 cup granulated sugar
2 tsp. cinnamon

1 stick of  butter
1  1/2 cup brown sugar
3/4 cup corn syrup
1 tsp vanilla

Heat oven to 350.

Either flatten biscuits slightly and cut in half, or leave whole and not flattened.
In a bowl, mix together the cinnamon and sugar.
Coat each biscuit in the cinnamon sugar mixture.
Lightly spray baking dish with non stick spray. Place biscuits in dish upright. Don’t pack them in.

In a sauce pan, melt the butter and stir in brown sugar and corn syrup. Bring to a low boil, stirring constantly. Remove from heat and let cool for a minute. Pour all over the biscuits.

Bake for 30 – 35 minutes. Allow to set for 5 minutes. Turn out onto a platter, or leave as is.
optional: Drizzle with extra goo or an icing of powdered sugar and milk. (To 1 cup of powdered sugar, add just a couple drops of milk and stir to thin consistency.)

The BEST Oh-so-Sweet Potatoes…..

I am a huge fan of sweet potatoes. I love them just baked plain, with nothing on them. I like them candied, fried…..in pie….in rolls…..any which way. Sweet potatoes are my favorite Thanksgiving dish.

For years and years, I made them the way my mom made them. But I got a bit bored with them. Then I made them mashed with sweet, crumbly stuff on top. Then I made them with homemade marshmallows….YUM!!!!!!!

But of all the ways I have ever had them, this is my most favorite. I didn’t even put marshmallows, can you believe it? It just doesn’t need it. You could certainly add them, but they would be just too sweet I think. Hey….you do whatever you want. But maybe just have a bowl of melty, toasty marshmallows on the side. That way you and your guests can add a dollop on top if you want it. I simply line a baking sheet with some parchment or foil. Throw your marshmallows on there and bake at 425 for just a few minutes. Watch them carefully! Or, sometimes I just torch them. Then, just scrape them off the baking sheet, into a bowl. It’s a great cake topper too.

Ok, now back to my taters…..These potatoes are so buttery rich. The sauce is very caramel like and amazing. Seriously, you will fall in love with these, I kid you not. With each bite, you will be moaning or saying SO GOOD. Oh, and they are really good cold the next day. That’s if you have any left!


The Best Oh-So-Sweet Potatoes

The topping ingredient amounts are for 1 large sweet potato that will feed 3.

1  large sweet potato
1  Tblsp butter, melted
1/2 Tblsp olive, canola or vegetable oil

Topping:

3/4 cup brown sugar
2 Tblsp granulated sugar
2 Tblsp flour
3 Tblsp butter, melted
1 tsp vanilla

Heat oven to 375.

Slice peeled potatoes almost 1/4″ thick. Cut the slices in half. Toss them with the 1 Tblsp butter and 1/2 Tblsp oil. Line the slices of potatoes up in a baking dish.

For the topping, in a bowl, using a fork….mix together the sugars, flour, melted butter and vanilla. Sprinkle it over the potato slices, gently patting it down on the slices. Bake for approx. 30-35 minutes. I did 30 minutes and the potatoes were perfect and not mushy.

Remove from oven and spoon some of the melted goo all over the potatoes. Be careful, as sugar is scorching hot when heated and it can burn your mouth if you get too anxious. I wouldn’t know anything about that. 😦 ouch.

Seriously, these are amazing.


Caramel Apple No Bake Cheesecake in a jar……

It’s the season of apples. It seems like everyone loves apple pie, apple cider, apple dumplings, caramel apples, etc. I wanted to make a special birthday treat, so I decided on a caramel apple no bake cheesecake. Since it was for a birthday, I wanted it to be special so I decided to do it parfait style….a special dessert for one. A nice jar, filled with layers of cookie crumb crust, cheesecake filling and caramel apple filling. You could very well do this in a pie pan or cake pan, but I like seeing the layers. Oh and this works great with any fruit filling.

You could do several little jars for your holiday desserts and attach a little spoon with some ribbon around the jar. What a sweet little treat for everyone.

Let’s get started.


Caramel Apple No Bake Cheesecake in a Jar
Makes enough for 6 individual desserts

Apple Filling:
2 green apples, sliced or chopped (I leave the skin on for tartness)
1  cup  light brown sugar
2 Tblsp butter
1/2 tsp cinnamon
2 Tblsp water
4 Tblsp heavy cream

In a sauce pan, stir together the apples, brown sugar, butter, cinnamon and water. Cook over medium heat, stirring it occasionally, until the apples are the consistency you like. Add the heavy cream and continue to cook until it thickens a bit. Remove from heat and allow to cool completely. I place it in the refrigerator to cool.

While the apple filling is chilling, prepare the cheesecake filling.

Cheesecake Filling:
2 blocks cream cheese (8 oz) very soft
1/4 cup + 1 Tblsp powdered sugar
1 tsp vanilla
4 Tblsp heavy cream

In a mixing bowl, whip the cream cheese until nice and creamy and smooth. Add the vanilla and powdered sugar. Mix well. Add the heavy cream and mix for 1 minute. I fill a piping bag with the filling. It’s much easier to layer this way. If you don’t have a piping bag, just fill a large zip lock bag and cut off one corner of the bag. Squeeze the filling through the hole in the bag.

Crust:
2 cups cookie crumbs (graham crackers, shortbread, etc)
Just take your favorite crunchy cookie and smash the heck out of  them.

Let the layering begin!!!

In a nice glass or jar, start the layering process, starting with the crumbs. Then comes the cheesecake filling and then the fruit. Repeat. Cover and chill.

If you don’t want to mess with all the individual jars, just put it all together in a serving dish…..crust on the bottom, cheesecake filling and then the fruit topping.