Taco Meatballs in Chipotle Cream Sauce………………………..

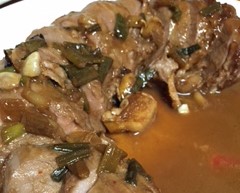
If you love meatballs like I love meatballs, then you must try these! Ground beef, potato, cheese, onion….all that yummy goodness rolled into little balls of YUM! Use ground chicken or turkey if you’re not into beef. They are so delicious as is, but after simmering in a pool of creamy, spicy chipotle sauce…..oh wow. So good. I posted a chipotle sauce recipe recently and this is similar to that one, but this one is a bit lighter. This is a great potluck dish…..and it’s what I am taking to our office potluck tomorrow! I’m going to put it all into a crockpot to keep warm. I’m tellin ya, you just gotta try these.  🙂
chipotlemeatballs

chipotlemeatballs3

Taco Meatballs in Chipotle Cream Sauce

1  lb ground beef, chicken or turkey
1/2 cup bread crumbs
1 pkg taco seasoning
3 green onions, minced
1 egg
1/4 cup water
1 cup shredded cheddar or jack cheese
1 small potato, shredded

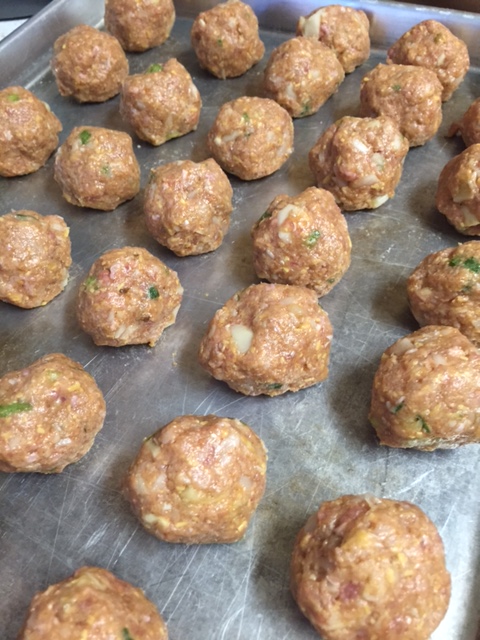
Mix all the ingredients together. Form into little balls. Place on a baking sheet and bake at 375 for about 45 minutes or until starting to brown.  Remove from baking sheet and place on a paper towel to drain any grease.  Make your sauce while the meatballs are cooking.

Chipotle Cream Sauce

1 medium size can of beef or chicken broth
3 cloves of garlic, minced
3 chipotles (canned, in adobo sauce)
salt and pepper to taste
1 cup sour cream
1 cup water

Dump the broth, garlic, water, salt and pepper into a medium size saucepan. Heat till starts to simmer, add chopped chipotles and cook at medium/low heat until the chipotles
get really soft. Break them apart with a fork.  Add the drained meatballs. Cover and simmer   for  20 -25 minutes, or until tender. Enjoy.


Red Velvets….

I LOVE red velvet. Some folks just can’t get past the color. That red really bugs them. Some folks say the red dye is dangerous. One person told me that their tummy felt weird after eating a cupcake. He swore it was the red dye. But I had to remind him that perhaps it was the fact that he ate 4 cupcakes in a short period of time and not so much the red dye.  Some people are bothered by all that oil……but  it’s the color that bothers people the most. I happen to love that deep, rich, bright red. It’s in such contrast with the white frosting. It’s beautiful to look at…..and then that first bite….M-mmm-mmm. Super moist crumb….just melts in your mouth. Then there is that ultra rich frosting. A little bit of that tangy, buttercreamcheese frosting goes a long way. I have 3 recipes that I use for red velvets. This is one that rises (crowns) more than my other recipes. Good crumb, moist, melts in your mouth. I hope you will try it.

rv3 rv2 rv1

Red Velvet Cupcakes

2 1/2 cups all purpose flour
2 cups sugar
2 teaspooons cocoa
1/2  teaspoon salt
1 teaspoon baking soda
2 eggs
1 1/2 cups oil
1 cup buttermilk
1 Tablespoon vinegar
1 teaspoon vanilla
2 tablespoons red food coloring
1 tablespoon water

Makes 23 cupcakes

Preheat oven to 350 degrees. Line cupcake pan with liners.

Lightly whisk eggs in a mixing bowl with a wire whisk. Add remaining liquid ingredients and whisk together  until blended. Set aside.

Place  the dry ingredients in your mixing bowl and stir together. Add wet ingredients to the dry ingredients and mix on medium speed for about a minute or everything is completely combined.  Pour into your cupcake tins. Bake for about 20 minutes or until a toothpick inserted comes out clean. Check them at about 18 minutes. Oven temps vary.  Allow to cool, remove from tins. Place in a covered container (the steam will make them more moist) while you make the frosting. Frost and enjoy.

Frosting

 1 block of cream cheese, softened
1 stick of butter
1 tsp vanilla
1  16oz box of powdered sugar ( may need a little more) depends on how thick you like it.

In a mixing bowl, whisk the butter and cream cheese together till creamy and fluffy. Add the vanilla and the powdered sugar and beat till very smooth and creamy. If it’s too thick for you, add a couple drops of milk. If it’s too thin, add more powdered sugar. YUM

Teriyaki Pork Tenderloin…….

Teriyaki anything is wonderful. I mean, who doesn’t like teriyaki!! Whenever I  teriyaki a pork, it is usually a pork shoulder roast, but this time I did a tenderloin. I highly recommend them. You’ve all seen them in your grocery stores, I’m sure. Usually it’s Farmer John brand, about 12″ long, sealed in a package. They do come marinated, but you will want a plain one for this dish. After soaking for hours in a teriyaki hot tub (the pork, not YOU), the pork will be so tender and juicy. You will love this. YAY! I always serve it with rice….teriyaki and rice….that’s a no brainer, right? If you have any leftovers, which I doubt…it makes a great sandwich or use it with my japanese noodle soup. (recipe is in my recipe index) 🙂

teriyakiporkloin teriyakiporkloin2

teriyakiporkloin3 teriyakiporkloin5

Teriyaki Pork Tenderloin

1 pork tenderloin roast ( this is for a 1 pound roast)

Teriyaki Marinade

1 cup soy sauce
2″ nub of fresh ginger, sliced
3 cloves of fresh garlic sliced
3 green onions, sliced
1 tsp chili paste or hot sauce
1 tablespoon of honey
1/2 cup orange juice ( sometimes I leave it out)
2 tablespoons of vegetable oil

Just throw all those ingredients in a dish that isn’t too big….just big enough to fit the roast in. Unwrap your roast, give it a good rinse off. Place it in the marinade. Allow to marinate for at least 6 hours in the refrigerator. When ready to cook, heat oven to 350 deg.  Remove the pork from the marinade, place it on  a small roasting pan, reserving the marinade. For a 1 pound tenderloin, I cook it for 40 minutes. Allow it to rest for about 5 minutes, before slicing. In the mean time, pour the reserved marinade in a small saucepan and heat till it starts to boil…..let it simmer for a few minutes. (remember, it has  had raw meat in it). Add a pat of butter. Pour it over your sliced tenderloin. Serve.

This is such an easy and quick dish to make. You will make it again and again. ok, but not too often…you don’t want to get sick of it!

Bacon, cheese and green onion scones………………………..


A lot of folks wrinkle their nose when they hear the word SCONE. They think DRY, CRUMBLY…..kinda like the ones in a popular coffee shop who used to have really good scones, but then all of a sudden made them smaller and more dry. BLEKH. If you have never had a scone, think of a good biscuit. A flaky, tender, buttermilk biscuit. A scone is similar but it usually has stuff in it….like fruit. Usually scones are sweet. I love those. I have posted a couple of those kind. But I also like savory scones. These are loaded with bacon (which you do not have to add), cheese, green onions, jalapenos and lots of black pepper. They are best, slightly warm, with or without butter. It’s the perfect “something” to serve guests. You could pretend you have this wonderful Bed and Breakfast Inn, that people all over the world want to visit, just to have one of your scones! Does that sound wonderful or what! You can leave out the bacon. You can add so many things to this recipe. I hope you enjoy it.

Note: the reason they are so light in color, is because I used mostly Jack cheese, which is light in color.  I also slightly underbake  to avoid them being too dry and making you hack and cough. Then you would complain that my scones are dry, like that popular coffee place and we can’t have that.

savoryscone

savoryscone2

Bacon, Cheese, Green Onion Scones

3 cups all-purpose flour
1 tbsp. baking powder
1 tsp. salt (less if you’re adding bacon)
1 tsp. black pepper
1 stick of  cold butter, cut into small pieces
1½ cups grated cheddar cheese (I used cheddar and pepper jack)
4 green onions, sliced
1/2 of a small jalapeno, minced
4 or 5  slices bacon, cooked and chopped in small pieces
1 cup plus 3 tablespoons of  buttermilk

Preheat the oven to 400˚. In a food processor, combine the flour, baking powder, salt and black pepper; mix briefly to combine. Add the cubes of butter and pulse on low speed until the mixture is crumbly and the butter pieces are about the size of small peas. You can do this in a mixer too, using a paddle attachment. Dump the mixture into a big bowl and stir in the grated cheese gently and DONT OVER DO IT. Gently mix in the green onions, bacon, and the buttermilk into the mixture just until everything is incorporated. Form into a ball. Don’t handle it too much. Place the dough on a lightly floured surface and pat the dough into an 8″ circle, about 1″ thick.  Slice the dough into 8 to 10 wedges. Carefully place wedges on a parchment lined baking sheet. Bake for 14-18 minutes depending on how hot your oven runs. Stick a toothpick in and you should have just a few little crumbs. Allow to sit for 10 minutes. Eat as is, or open it up and slather with butter. 🙂