Copycat Disneyland Chocolate Chip Cookies….

I’m always looking for good chocolate chip cookie recipes. I have my favorite 2 recipes and they are the best, so I don’t know why I keep trying other recipes.

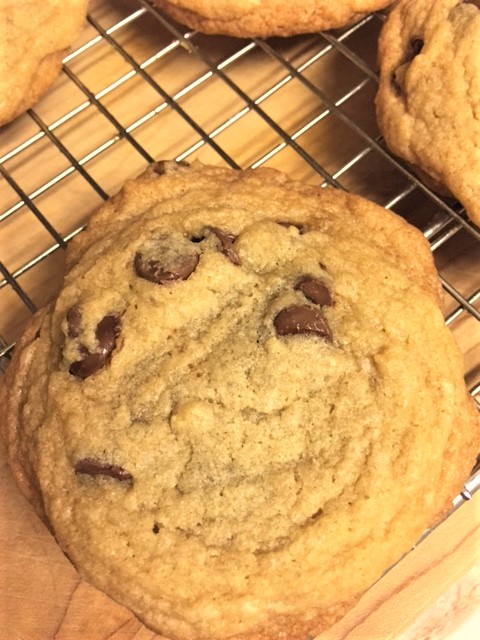
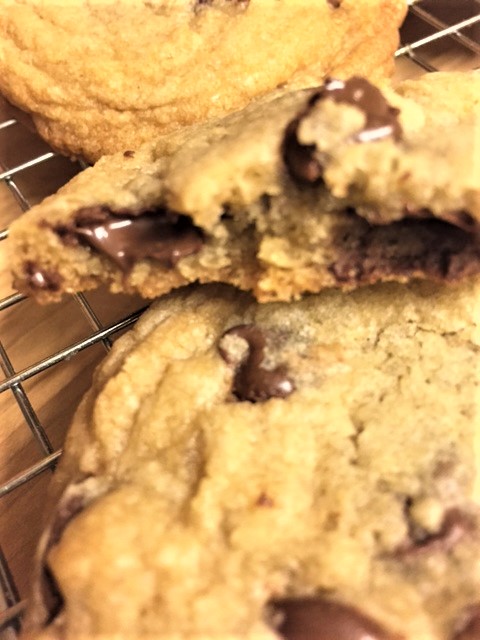
I came across this copycat Disneyland ccc the other day and gave it a try. I mean, who doesn’t like Disneyland….it represents everything good and happy! The thing that really caught my attention was the powdered sugar instead of the usual granulated sugar and also the sugar crystal sprinkles in the dough. You can get them pretty much anywhere, but Michael’s or Hobby Lobby has them in the cookie decorating section. They are just big crunchy clear sprinkles that you would put on cookies or cupcakes. If you can’t find them, you can use turbinado sugar. It’s the crunch of the course textured sugar that sets these cookies apart from other ccc’s.

It is a good cookie….a bit on the cakey side. If that’s the type of cookie you like, then you will love these. They don’t spread out really flat like a lot of ccc’s do. The crunch of the course sugar gives these a little bit of crunch but the cookie is soft, not crispy. I do like these, but I like others better. But I think you should try these and let me know what you think!

Copycat Disneyland Chocolate Chip Cookie

1 cup (2 sticks) soft butter
1 cup light brown sugar
3/4 cup powdered sugar
1 egg
2 Tblsp water
1 tsp vanilla
2  2/3 cup AP flour
1/4 tsp salt
1/2 tsp baking soda
1/4 cup sugar crystal sprinkles or turbinado sugar
1  1/2 cups semisweet chocolate chips

Cream the butter and sugars together until well mixed. Mix in the egg, water and vanilla. Mix in the  flour, salt and baking soda, just until combined. Don’t overmix.

Gently stir in the sugar crystals and the chocolate chips. Chill the dough for an hour. Line baking sheet with parchment paper. Heat oven to 350.

Drop large scoops of dough onto the baking sheet…approx. 1/4 cup scoops……6 scoops a sheet. Bake for approximately 13-18 minutes, depending on how hot your oven runs. They should be golden brown. Cool completely. They taste much better once cooled completely.

Makes 18 good sized cookies.

Semi Homemade Ginger Lemonade…..

I apologize for posting about fresh ginger again. I know I have done a few posts explaining how much I love it. But I think I may be a bit addicted to it. Hey, it could be worse, right? Besides, do you know how healthy ginger is for you???

So, there is a bottled ginger lemonade out there that I recently discovered. It was immediate love the first time I tried it. Wow, it is intense with both pucker and ginger flavor. It is so good. But unless it’s on sale, it’s a bit pricey at $3.00 a little bottle. It’s just so good! There is a lavender lemonade and lemongrass lemonade also.

Well, I decided to make my own. I didn’t want to bother with squeezing a bunch of lemons. Not this time, but I will do that another time. So, I picked up a bottle of my favorite lemonade, which I love because it’s pretty intensely puckery. (is that a word?) Here is what I did:

  This is the one that I recently discovered. Delicious.

    This is my favorite store bought lemonade


chopped ginger

Ginger Lemonade

1 bottle of lemonade, 1.8 qt size (homemade or store bought)
approximately 1/2 cup of fresh chopped ginger

Pour 1 cup of the lemonade into a saucepan. Add the chopped ginger and let it come to a low boil. Turn off the heat, cover and allow to steep for a couple of hours.

At this point, you can either drain off the liquid from the ginger bits and pour just the liquid into your lemonade, or you can add the ginger to your lemonade as well. It depends on how intensely ginger-ish, that you like it. I add all of the ginger bits to my lemonade. If you can, let it set in the fridge for a couple of days so that the lemonade and ginger really come together.

By the way, this makes a great cocktail mixer. You can also make a fantastic Arnold Palmer iced tea too! Or popsicles! Better get started!


Spice It Up…………………

What do you do with an over abundance of chile peppers? Well, you marinate them, you make relish, you grill em and you make hot sauce! Lots and lots of hot sauce. Lots. I love making  hot sauce. But breathing in the fumes and leaving all the windows closed is not recommended. Unless of course you don’t mind coughing your brains out and having your eyes burn and tear up.

Now, it’s no secret that I am a spicy girl. I have to have a little heat with everything I eat. I will drown my food in crushed pepper flakes, hot sauce, salsa, jalapenos, etc. It’s just so good. I even love my hot cocoa with a sprinkle of cayenne pepper. One of my favorite chocolate cookies has some heat to it as well. I will admit though, that I can’t handle the heat like I used to. Oh, big sigh. Tis a sad thing. It sucks getting old. Hahahahah.

Anyway, I’ve been passing out bottles of hot sauce to my spicy friends, hoping they will enjoy it as much as I am. I should tell you…..this isn’t a salsa that you would eat with chips. It’s more of a table hot sauce like a Tabasco or the other little bottles of hot sauce. It’s vinegar based, so you get that pucker and then the heat. So while your face is puckering up, you will be dripping sweat. Very attractive, don’t you think? Hahahahah.

Oh!! can I tell you…….If you take some fresh pop corn, drizzle it with a mixture of melted butter and hot sauce and then put it in the oven for a few minutes, it’s SOOOOO good. You just gotta try it. My favorite way to enjoy this hot sauce is on some over easy eggs and fried potatoes. M-mmmm-mm.

If you don’t have a garden full of peppers, just go to a farmers market or the grocery store and get yourself some peppers. The sauce will last in your fridge for about 6 months. But you will use it all, long before that.

  
As you can see in the picture above, I also made a Habanero version. Wayyyyy too hot for me.  Holy crap! I should have worn gloves and goggles for this one. I’ve decided it’s not for me. I’m not a fan of the taste of habanero. It’s funky. Blekh. But if you like habanero, then by all means have at it. You’re biscuits will be burning for sure.

Everyday Hot Sauce

20 medium size jalapeno peppers (I used green and some that had turned red) roughly chopped
7-8 Serrano peppers, roughly chopped
4 cloves of fresh garlic
2 cups of distilled vinegar
3/4 cup water
2 Tblsp kosher salt

Dump the peppers (seeds included), salt and the garlic into a food processor. Pulse until you have a fine relish like consistency. Add about 1/4 cup of the vinegar. Pulse, pulse.  Carefully scrape the mixture into a sauce pan. Pour in the rest of the vinegar and the water. Heat it on medium heat until it comes to a boil. Boil for only a minute. Let it come to room temperature.

Carefully pour it into a glass jar. Not plastic. Seal it tight and put it in a cool dark place for 3 days…..2 days if the weather is really warm. Give it a good shake, shake, shake. Now you can decide if you want to strain it. I don’t. I like the little bits of chile. But if you want a clear smooth sauce, strain your sauce into a fine mesh strainer. Press down on the mixture so you get every bit of sauce. Toss the solids. I just cant do it! But that’s me.

Pour it into little hot sauce bottles or jars. Don’t use plastic containers. Keep it in the refrigerator. It will continue to develop flavor over time. Shake it up before each use.

Tips:
-if you find it too vinegar-ish, add a wee bit more water and shake it up.
-if you like it with a bit of tomato taste, add some tomato sauce.

Pizza Portabello…………………

Years ago when I was on a low carb diet, I was always looking for things to make that were not only low carb, but also tasty. I was craving pizza one day and knew I couldn’t have the crust. I used a big ol Portabello mushroom for my “crust”. This became one of my favorite dishes. After I was done with the whole low carb thing, I still continued to make this dish and served it on a bed of angel hair pasta. YUM.

It’s a great dish to serve guests. It’s very filling and really does taste like a pizza pie! So, whatever your favorite pizza toppings are, just throw them on top of a mushroom!


Pizza Portabello

Some good size Portabello mushrooms (depending on how many you are making)
Use your own favorite pizza toppings, but I used the following:

mozzarella cheese, grated
fresh cherry tomatoes, pan seared with minced garlic
Italian sausage, cooked thoroughly
sun dried tomatoes, sliced thin
dried oregano

Heat oven to 375. Cut off the stem of the mushrooms and toss. Take a spoon and carefully scoop out just some of the inside of the mushroom. In a skillet, melt some butter.  Place the mushrooms in the butter and allow to cook for just a couple of minutes. Flip the mushrooms over and do the same on the other side.  Place the mushrooms on a baking sheet and pour any remaining butter that is in the skillet, over the mushrooms.

Now you start piling on your toppings. If you are using sausage, scoop that on first. Then put the rest of your toppings, ending with the cheese. Gently pat the cheese together, to somewhat keep everything together.

Bake for approximately 15 – 20 minutes, until the cheese is all oozy goozy.

As I said earlier, this is great served on a bed of angel hair pasta.

I highly recommend serving this with a nice white wine!