Boozy Pineapple Skewers

It’s been a hot summer. I hate heat….anything over 70 degrees is hot to me. I have no idea why I live in California. But that’s a whole different story.

I love fruit any time, but especially on these hot summer days . One of my favorites is fresh pineapple. Unfortunately it doesn’t like me these days and I rarely eat it. Damned indigestion issues. One of the unfun things about getting older. Lot’s of things give me indigestion nowadays. Rgggghhhhh. One of these days I am going to blog about all the unfun things about getting older. If you are one of my younger readers, you will be saying “WHAAAAAAAAAAT??!!” But if you are older, you will totally get it. Hahahahaha.

Ok, so if you like pina coladas…….isn’t that a song? You will like these skewers. I love a good pina colada, but I prefer it with vodka rather than rum. I once got very sick drinking rum……but that too is a whole different story. 🙂
When you order it with vodka, it’s called a chi-chi. The Bali Hai restaurant here in San Diego, makes the best!! Well, these skewers remind of that drink.

Fruit soaked with alcohol is yummy. I will give you another yummy idea at the end of this post.

These pineapple skewers are not real sweet. The only sweetness comes from the pineapple itself. If you want it sweeter and the pineapple isnt real sweet, you could use pina colada mix instead of the coconut cream. But personally, I find that way too sweet.

Dont try to hurry the process. You really should soak your fruit at least overnight.

Enjoy!!!!

Dont these look so good? yummmmmmm

Boozy Pineapple Skewers

fresh pineapple chunks (about 2 cups)
1 cup vodka (or rum)
1 cup coconut cream
toasted shredded coconut

In a dish at least 2″ deep, lay out the pineapple chunks.
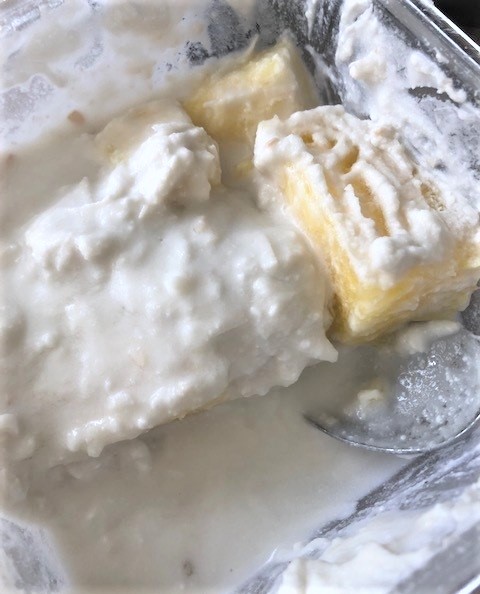
in a bowl, mix together the coconut cream and vodka. Pour it over the pineapple. Cover and chill for at least 24 hours.

Remove from fridge. The cream mixture will look a bit chunky. Just loosen it up with a spoon and spoon it over the pineapple.

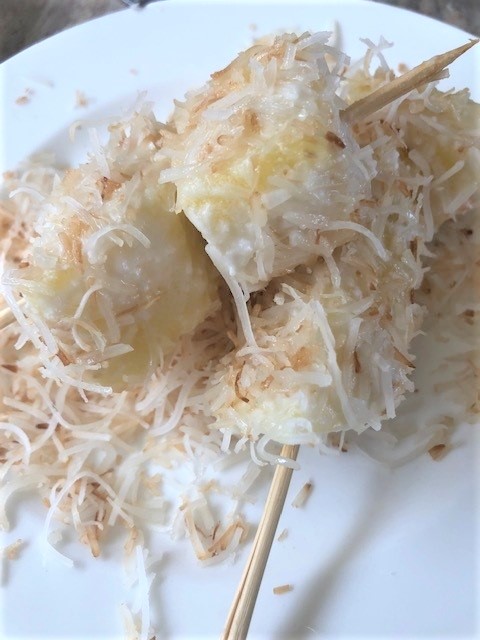
Put pineapple chunks on wooden skewers. Dredge each skewer in the toasted coconut. You could even add a maraschino cherry!

Another boozy fruit idea:

  • Watermelon margarita skewers: soak watermelon chunks in a mixture of tequila and lime juice. Skewer fruit and sprinkle with coarse salt.

The Best Beef Stroganoff…

One of my favorite dishes is beef stroganoff. To me, it’s one of the comfort dishes of life. I know most people serve it with egg noodles, but I have always preferred it over rice. But the other day I saw a recipe on line that made me crave it with noodles. I also noticed that her recipe called for tomato paste. It reminded me of my friend Val. Way back when…….waaaaaay back, when we were roomies, I would make beef stroganoff and she would always try to sneak in some tomato paste. I would get so mad and I couldn’t leave the stove because the second I would walk away, there she was adding tomato paste. Hahaha. I just didn’t think it belonged in a beef stroganoff. Well, I decided to try it. The recipe I saw, called for 2 Tablespoons. But I only used 1 Tablespoon in my recipe. I have to be honest…..I don’t know that it really made a difference. Whether you use it or not, I think you will love this recipe. It’s rich and creamy and it’s even better the next day.

This recipe takes about an hour and a half to cook, but it’s worth the wait. You’ll want your beef to get good and tender so I wouldn’t recommend cutting the cooking time short.

I did enjoy it with egg noodles. I mean I realllllllly enjoyed it. But I think I still prefer it with rice. But that’s just me.

Best Beef Stroganoff

approx. 2 lb sirloin or stew meat, sliced thin
1 Tblsp Worcestershire sauce
½ lb mushrooms, sliced
1 tsp kosher salt
1 tsp black pepper
1 Tblsp oil
1/2 yellow onion, sliced
2 garlic cloves, minced
1 cup water
1 cup beer ***
2 tsp bouillon beef base,
1 package egg noodles

*** if you don’t want to use beer, replace with additional cup of water, but the beer helps tenderize the beef and gives a real depth of flavor.

1 ½ cup sour cream
3 tbsp flour
1 ½ Tblsp tomato paste

In a large pot, heat the oil. Add half the beef and allow to brown. Remove beef onto a plate and add the second half. Once browned, remove onto plate.

To the pot, add the sliced onions and garlic. Stir until starting to soften. Add the beef back in the pot along with the beer, water, Worcestershire sauce, bouillon, salt and pepper.

Allow to come to a boil. Once it comes to a boil, reduce heat to a simmer and cover pot. Allow to simmer on low for 1 1/2hours.

While beef is cooking, cook the egg noodles. When noodles are done cooking, drain water and toss the noodles with 2 Tblsp butter.

In a small bowl, mix together the sour cream, flour and tomato paste. Add it to the beef mixture. It will look curdled, but keep stirring until your mixture is smooth. Serve it over the cooked egg noodles, or mix the noodles right into the beef mixture.

Green Onion Dip…..

You know those little packets of dip they sell in the grocery store? I have always loved the green onion flavor but it’s hard to find anymore. Well, I made my own green onion dip and heck, I don’t care if I ever find those packets again! Hahahah.

This stuff is so good. If you like green onions, you are going to love this dip. It’s definitely oniony. It’s so easy to whip up too. It’s great on crackers, fritos, tortilla chips, potato chips. It would be great to serve with some fresh veggies if you wanted to be a little healthier, but who wants that! 🙂

Of course, I just had to make mine with some spicy spicy, so I added some fresh jalapeno. Yum.

Not much more to say about this dip, other than “go make some”. It’s a new favorite of mine for sure.

Green Onion Dip

8oz block of cream cheese, softened
1  cup sour cream (maybe a bit more)
3/4 cup minced green onion
2 cloves of garlic, minced
1 Tblsp fresh minced jalapeno (optional)
¼ cup minced fresh parsley
2 tsp lime juice or 1 tsp apple cider vinegar
salt and pepper to taste

With a spoon, mix together the cream cheese and sour cream really well. Add the rest of the stuff. Chill for at least an hour.

Serve with crackers, chips, veggies.

Best Spareribs Ever….

Everyone has their own “secret” to making good ribs. I love pork ribs and I have had them every which way. Every time I see the barbecue kings making their ribs on tv, I drool. Their ribs always look perfect. What makes a perfect rib to me? I like them to be tender but yet you can still bite the meat off the bone. I dont like taking ribs off the grill and having them all fall apart.

This post is more about the method of getting that perfect texture. Obviously you want good flavor so use your own favorite barbecue sauce. Or you can use my basic recipe, although I never make it the same way. I am always changing things up!

This method of foil wrapping them is perfect. Much better than boiling them first and then grilling. I’ve had them that way and while they are good and tender, the meat tends to fall off the bone before you even take a bite and you lose so much flavor boiling them.

The foil wrapped method steams them and all that porky flavor stays in the meat. While I do recommend putting them on a grill once steamed, you can do the whole thing in the oven if you don’t wanna mess with the grill.

So, there are two kinds of rib eaters. Some people cut the meat off the bone and use a fork to eat it. Then there are those that pick up a rib and bite it off the bone. Which one are you? I like to pick it up and eat it off the bone. It’s a rib! It’s meant to be eaten that way, right? What’s a little sauce on your fingers! Fingers can be washed. 🙂
But please don’t tell me you’re a finger licker! Ohhhhhh, I hate to see and hear people licking or sucking barbecue sauce off their fingers. Ewwwwww. Sorry to those finger lickers out there. Don’t mean to offend. Just a pet peeve of mine. 🙂 You are free to lick your fingers all you want in your own home. Just don’t invite me to dinner. Hahahahahaha.

after steaming in foil for 3 hours…….pretty plain huh?

Best Spareribs

3.5 lb rack of ribs
Barbecue sauce of your choice (I’ve included my quick sauce, but store bought is fine)
Rub

Rub:
1 Tsp garlic powder
1 Tsp onion powder
1 tsp paprika
1/2 tsp cayenne
1 Tblsp sugar (white or brown)

BBQ Sauce:
1/2 stick butter
1 cup brown sugar
1 cup catsup
1 Tblsp worcestershire
1 Tblsp soy sauce
1/2 tsp garlic powder
1 Tblsp yellow mustard
2 tsp apple cider vinegar (more if you like it tangy)
1 tsp liquid smoke (optional)
2 chipotle chiles (optional if you like it spicy)

For the sauce, just throw everything into a sauce pan and cook until it comes to a boil. Simmer for approx 10 minutes.

Heat oven to 275.

If you are using a rub, work it into the entire rack of ribs, front and back. Wrap the rack of ribs in heavy duty foil or 2 layers of foil. Make sure its sealed tightly on top, so that nothing gets in or out.

Place rack of ribs on large baking sheet and place in oven. Pour about 2 cups of water into baking sheet. (that’s why its important that ribs are wrapped well. You don’t want water getting into the foil.

Allow to cook for 3 hours, checking every half hour to make sure there is still water in the pan.

After 3 hours, remove the pan from the oven and drain any water that may be left. Carefully open the foil and brush barbecue sauce all over the ribs.

Grill method (my preference)

Remove the foil and put the rack of ribs on a hot grill (meaty side up) and put the hood down. Cook for 5 minutes.
Flip, brush, cover and cook another 5 minutes.
Flip (meat side up), brush, cover and cook final 5 minutes.
total time on the grill is 25 minutes

Oven Method

after the 3 hour cooking time, open up the foil. Brush barbecue sauce all over the ribs and broil until all bubbly and caramelized, about 5 minutes or so.

Secret to Scoop-able Ice Cream…Creamy Chocolate Ice Cream

Summer is approaching and that means ice cream time! Although, I think any time is ice cream time. Actually, I happen to love ice cream on a really cold day. I’ve probably said all that before in other ice cream posts, so let’s just get to the point. This particular ice cream is sooooooooo good. Creamy. Smooth. Delicious.

I like ice cream that is very firm and really cold. I hate letting it set out on the counter to allow it to soften. I will even use the tip of a butter knife to dig out little pieces of hard, cold ice cream. Is this weird?

Recently I was looking at ice cream recipes on Pinterest. I came across a recipe that suggested adding vodka to the ice cream mix to keep the ice cream from getting rock solid. I was so intrigued! It actually makes sense since alcohol doesn’t freeze solid. I would never, ever have thought of adding vodka to ice cream. But I couldn’t wait to try it. I used my go-to ice cream recipe and just added one tablespoon of vodka (half the amount she used). I mean, I do like vodka but I didn’t want my ice cream to taste like it.

You add it to the ice cream base before churning it in the ice cream maker. Vodka is a good choice since it’s pretty flavorless. I’m so glad I tried it because it worked! I had delicious, creamy ice cream that was scoop-able without being really soft. Great consistency.

One tablespoon of vodka for a whole batch of ice cream is nothing. I didn’t taste it at all. I certainly didn’t feel it….hahahaha.

What a good frickin idea, right?

Creamy Chocolate Ice Cream

1 cup sugar
4 egg yolks
¼ cup unsweetened cocoa
¼ cup chopped semi sweet chocolate
¾ cup half and half
¾ cup whole milk
1 ½ cups heavy cream
1 Tblsp vodka

In a bowl, whisk the sugar and eggs together until it’s a thick yellow paste. Set aside.

In a sauce pan, heat the half and half and milk just until it starts to simmer. Slowly pour it into the egg/sugar mixture, whisking the whole time. Pour that mixture back into the saucepan and heat till it starts simmering. Stir constantly until you have a thickened custard like consistency.

Strain the mixture into a bowl. Stir in the heavy cream. Cover and chill at least 8 hours. Stir in the vodka and pour it into your ice cream maker and churn until it sets up. I churned for 20 minutes. Scoop it all out into a container and freeze for at least 4 hours. But it’s good eaten right away too.