Drunken Pineapple Moscow Mule…………..

Recently, my darling daughter told me about a drink she had. It was a Drunken pineapple Moscow mule. The pineapple is marinated in vodka and is added to the Moscow mule. OMG. As she was describing it, I think I may have drooled a bit. I love Moscow mules. Have you ever had one? Traditionally, they are served in a copper mug. To me, it makes all the difference. But if you don’t have a copper mug, a glass will do. You will see both ways, pictured here. This is one of my favorite drinks and it’s perfect for this hot weather we have been having here in southern Cali. It’s not sweet, it’s refreshing and ohhhhhhhhh so yummy. You gotta be careful though, because these go down way too easy. I’ve made many a variety of these…….strawberry, peach, jalapeno, plain and watermelon. All are delicious. Sadly, as much as I love pineapple, I have to avoid it since it gives me massive heartburn. Big sigh. But ever since my daughter told me about this drunken pineapple thing, I had to try it. I will pay for it later I’m sure. But a couple sips or 4 won’t hurt right? Cheers!
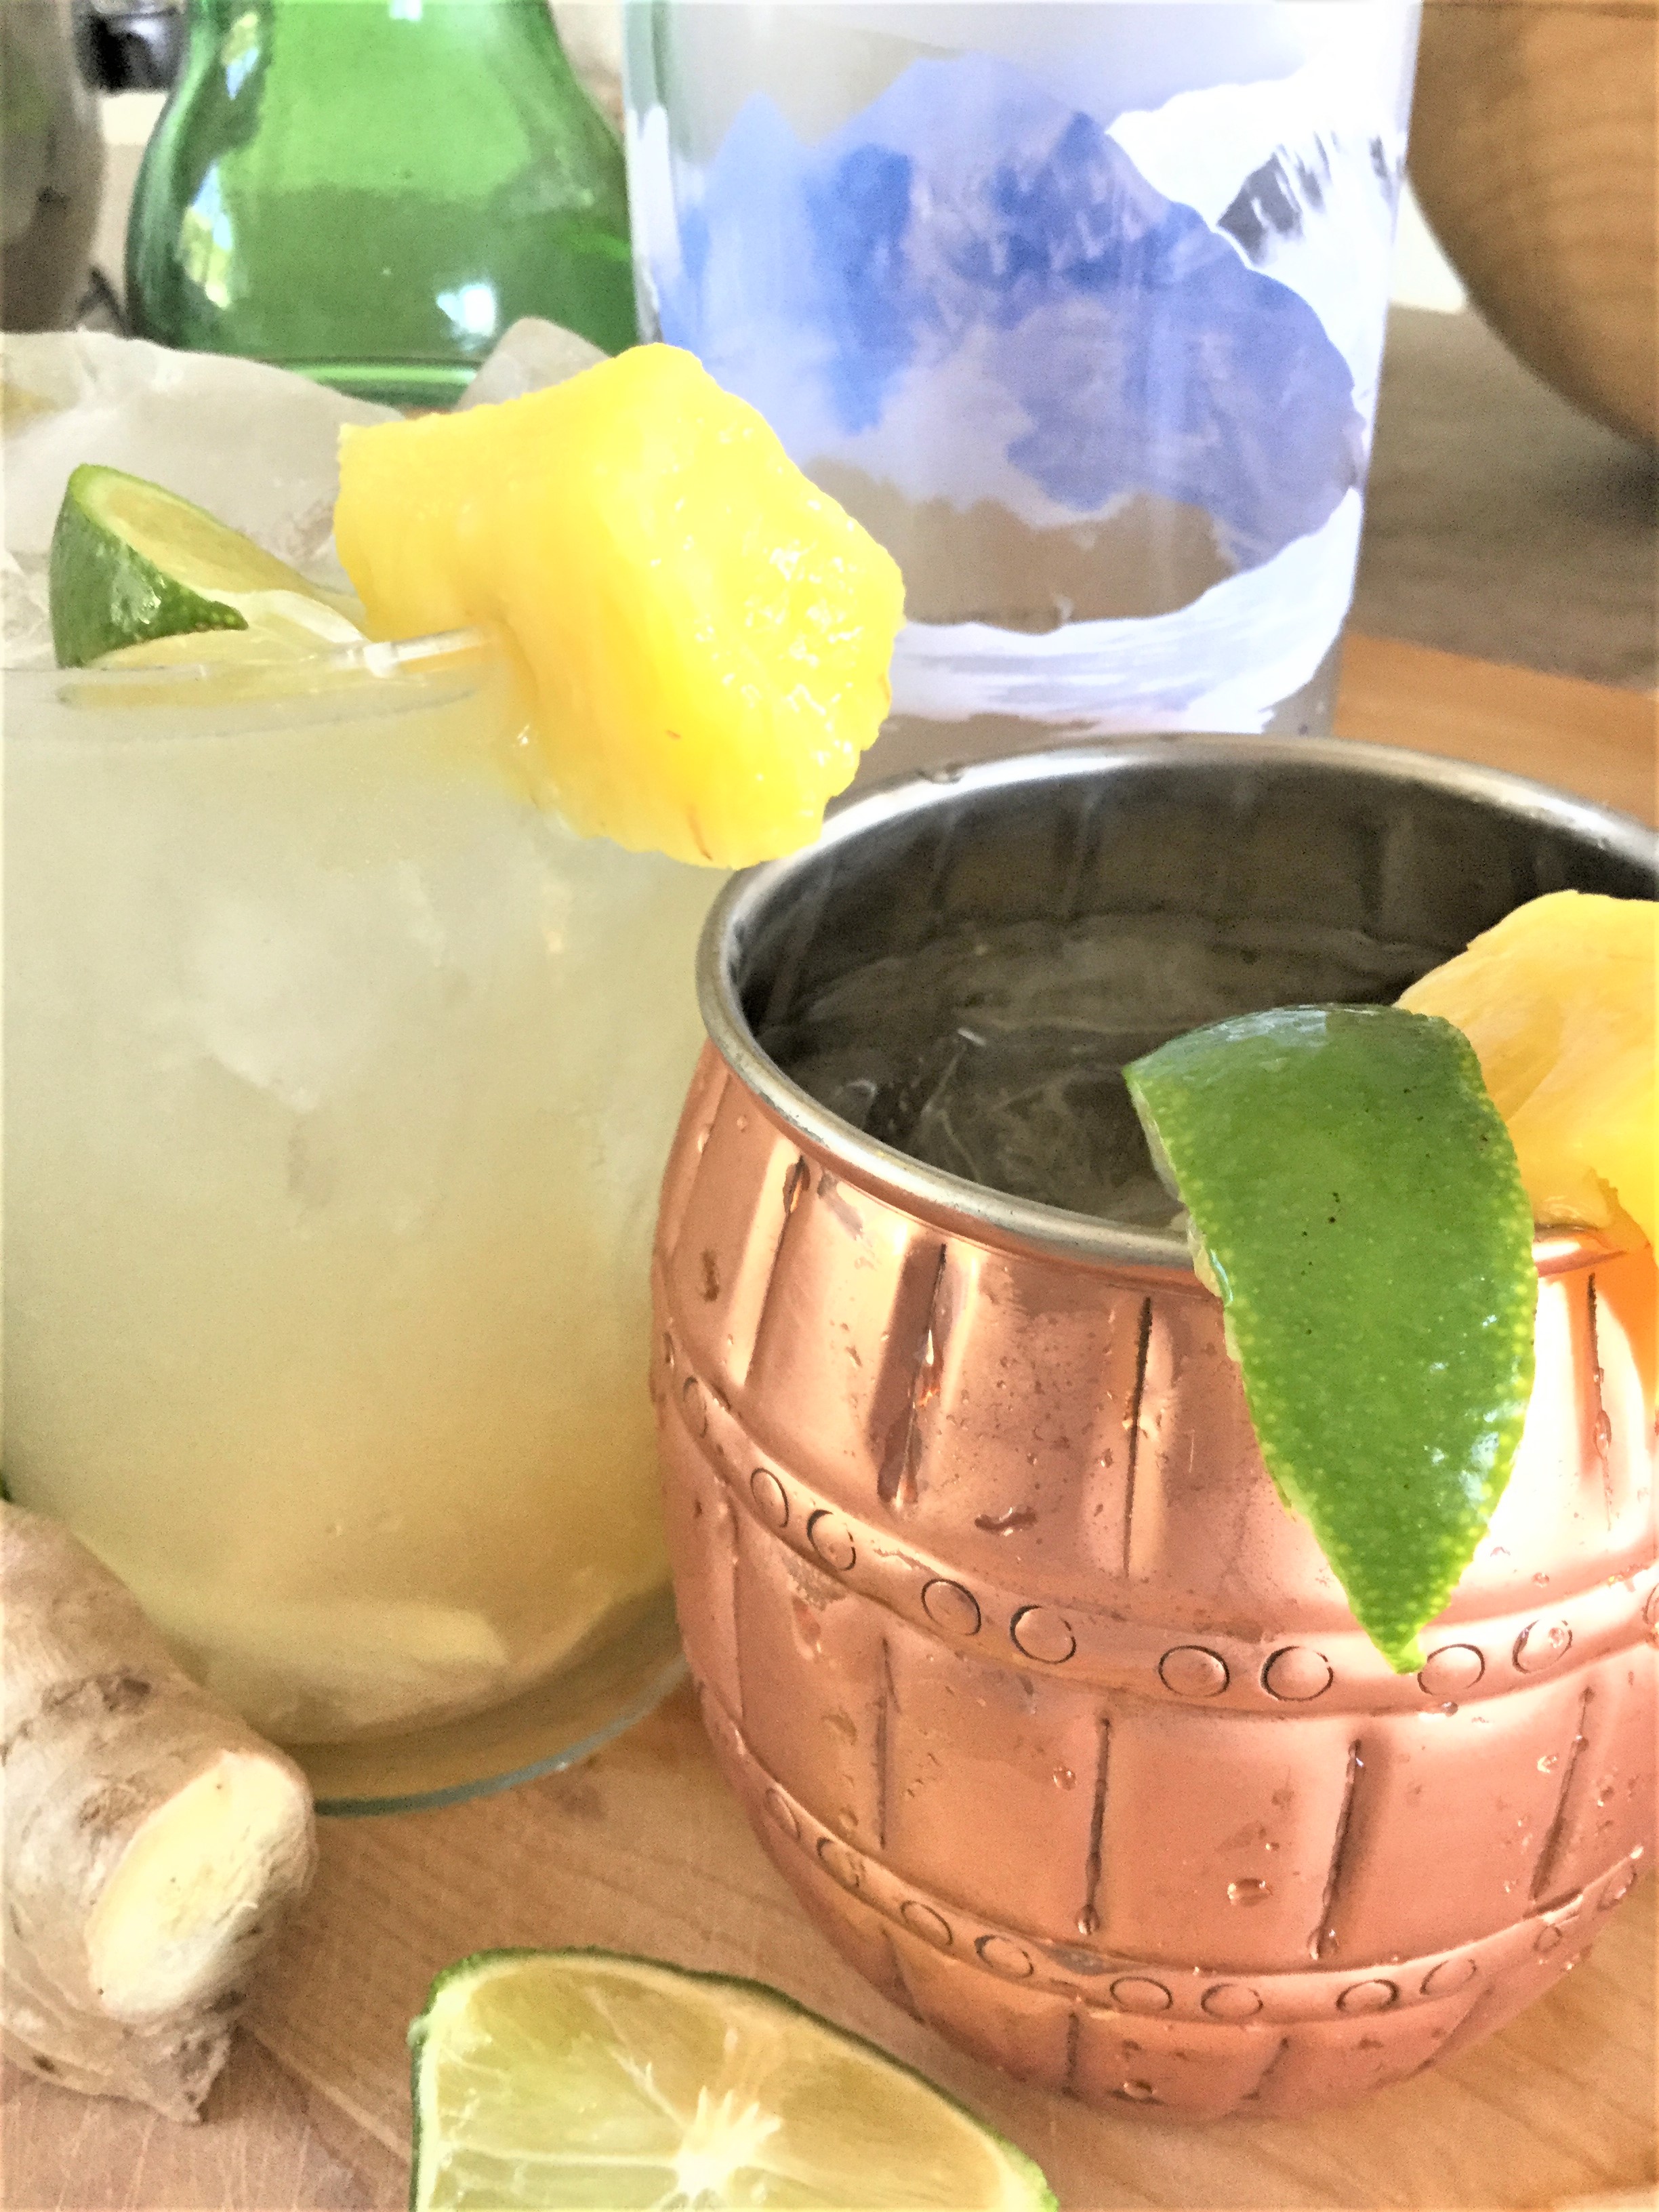
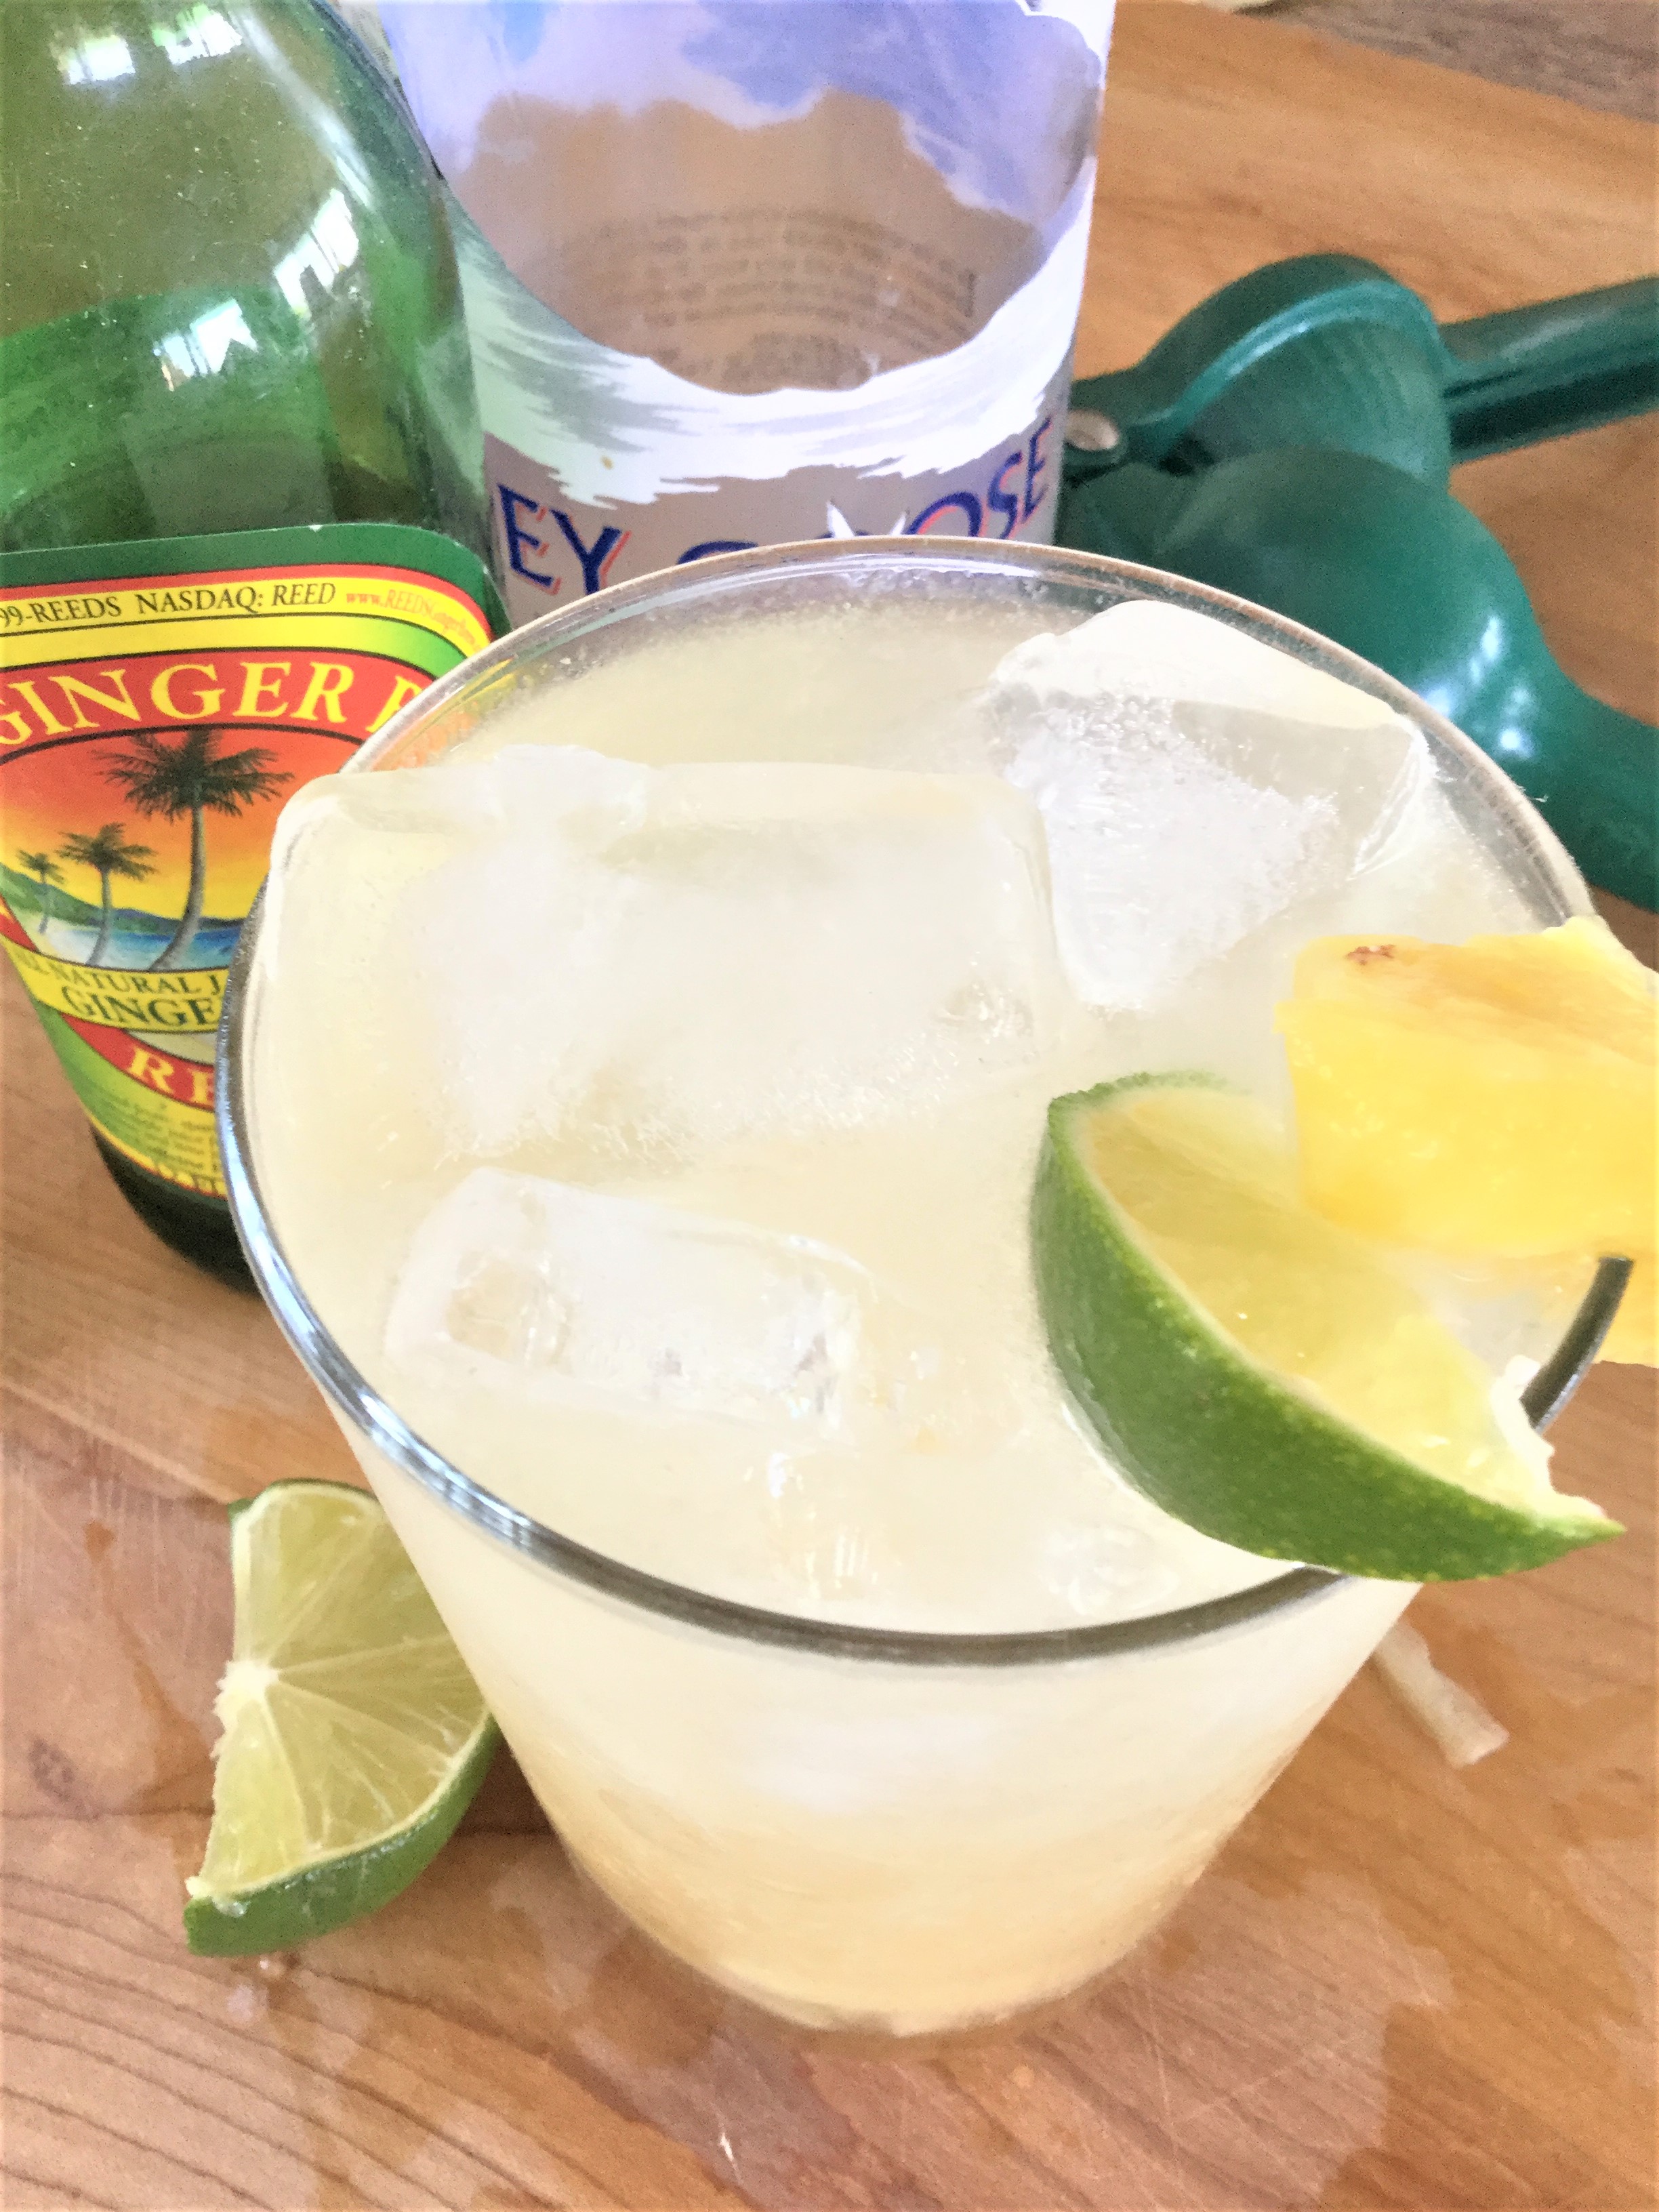


2 oz vodka
4 oz ginger beer
1 oz lime juice
Fresh Ginger
pineapple chunks **

In a copper mug or  large glass, place some fresh ginger slices with the lime juice. Muddle it just to release some of the ginger juices. Add the vodka and ginger beer. Give it a good stir. Add lots of ice and some pineapple chunks and enjoy!

** for drunken pineapple, just place some pineapple pieces in a container. Sprinkle with a bit of sugar and pour some vodka over it. Allow to set over night or longer in the refrigerator. Beware, hahahhaa, the pineapple really soaks up the vodka.

Variations:

Instead of pineapple, muddle in some peach slices, watermelon, strawberries, etc.


Chocolate Hazelnut Crispies….

Chocolate…..YES. Hazelnuts…..YES. Crispy…..uh, hell yeah. Chewy……YEP. Delicous……GIMMEEEEEE.

Are you looking for a totally new cookie experience? I found this recipe on line recently. The name of the cookie got my attention. Twisted Tollhouse Cookies. Cool, right? I have no idea why they are called that. They are nothing like a Tollhouse cookie. There are no chocolate chips either. I’ve decided to call these Chocolate Hazelnut Crispies. This is an interesting cookie and I just couldn’t wait to make them for you all. Ok, well…I made them for me, but I was thinking about you all and how much you would love these. The batter consists of the usual brown sugar, white sugar, egg, etc. But it also calls for grated chocolate and ground hazelnuts (hazelnut meal….or as some folks call it, hazelnut flour) Doesn’t it sound fun? If you are an appreciator of good cookies, you must make these. I know my friend Patti will make these for sure. She’s the best cookie baker I know.

This cookie bakes flat. They are also very brown. So don’t be worried that you did something wrong. Hazelnuts have a lot of oil in them, so that combined with the butter in these, makes them flat. The grated chocolate makes the dough all speckly and purty. All that grated chocolate becomes one with the dough.

It really is a unique cookie. But very, very good. I may have to put this one in my top 5 favorite cookies.

Chocolate Hazelnut Crispies

1  3/4 cup flour
1/2 cup hazelnut meal/flour ** see below
1  tsp baking soda
1/2 tsp salt
1  cup butter (2 sticks)
3/4 cup light brown sugar
3/4 cup sugar
1  tsp vanilla
2 eggs
9 oz bar of Ghirardelli bittersweet chocolate bar, grated or FINELY chopped

** You can buy hazelnut meal/flour in the store, but it’s pricey. I grind my own.
Toast the hazelnuts by placing them on a baking sheet and roasting at 350 deg, for about 8 minutes. You will start smelling their aroma. Don’t let them burn. Remove from oven and place them on a dish towel. Cover them with the dish towel and rub them all together. This will remove the skins of the hazelnuts. Place them in a food processor and pulse until you have a fine meal. Don’t over do it or you will have nut butter. Measure out 1/2 cup and combine with the flour, baking soda and salt.

In a large mixing bowl, beat the butter and sugars until fluffy. Mix in the eggs and vanilla. On low speed, add the dry ingredients just until combined. DON’T OVER MIX. Gently hand stir in the grated chocolate. Cover and chill for at least 2 hours.

Line a baking sheet with parchment paper. Heat oven to 350.
Scoop mounds (approx. 2 TBLSP) of dough onto the baking sheet, 2″ apart. Slightly flatten the mounds of dough.  Bake for 12 -14 minutes. Cookies should be brown and flat. Allow to rest on baking sheet for 10 minutes and transfer cookies to a cooling rack. They will get crispy.


Make your own Sun Dried Tomatoes…

What to do, what to do with an over abundance of little maters. Cherry tomatoes, Sun Sugars, Juliettes, Yellow Pears, Grape…….so many wonderful, tasty little babies. They are so flavorful….nothing like the ones you buy in the store. I am always snacking on these little morsels. I also love to pan roast them with garlic and olive oil. But then I thought they would be really good sun-dried!! Well, in this case, they are oven dried. It’s super simple to do this. It does take a while though. So do it on a day when you’re into a good book or movie, or working in the garden.

Oh, my gosh. They get all shriveled up and have super concentrated flavor. They are a little sweet, a little tart and a little chewy. You can store them in a container, just as is….dried. Or, you can put them in a jar and cover with olive oil. But either way, they are great for so many things! My favorite way to enjoy them is with some olive oil, butter, garlic and tossed with hot pasta….sprinkled with parmesan cheese.

You could also puree them with olive oil and parmesan, as a great pesto!! Get creative!


Sun Dried (Oven Dried) Tomatoes

tomatoes (obviously, hahahah)
salt

You can use all of one kind or a variety of little tomatoes. Cut them all in half from the stem side down. Place them on a parchment lined baking sheet. Roast them in an oven preheated to 225.

Like I said, these do take some time……about 4 hours. I rotate the pan every hour but if you have a good oven, you don’t have to. Check your tomatoes after 3 hours. If they seem dried and shriveled up, you may want to take them out. I like mine pretty dried. In fact, I will turn the oven off after 4 hours and leave them in there for another hour or so.

Once completely cooled, store them in a container or put them in a jar covered with olive oil. Keep refrigerated. They are best, kept dried. Great for snacking!

Shortcut Sticky Buns…………….

Have you ever had a sticky bun? They are very popular back east. It’s kinda like a cinnamon roll, but not. It has the same tender dough, but has a caramel like, sticky goo baked all over it. They usually have pecans on them…..and sometimes raisins. They are magical.

Years ago, I was back east with a friend of mine. We spent time in Pennsylvania, Maryland, Virginia….and every time we stopped at a grocery store or an eatery, I noticed sticky buns. “What is that?” I asked my friend Patty. She laughed and said “You’ve never had sticky buns?” I said “No, but I’m about to!” Now, I had always liked cinnamon rolls, but since I am not a huge cinnamon fan, it was really about the dough, for me. So, we were at the bakery counter at a grocery store and I bought my first sticky bun. I didn’t even wait till we got in the car. That thing was GONE. “I’ll be right back Patty”, I said. I went back in and bought an entire aluminum pan of those things. Patty couldn’t stop laughing. OMG, I made myself sick on all that sugar, but I was in love. Patty said “Just wait till we get to the Amish Bakery stands, you will go crazy”. She was right……I did. She was so excited to share her favorite Stromboli eatery and her favorite Philly cheese steak deli……so many good places. But all I really cared about were those darned sticky buns.

The first thing I did when I got home to San Diego, was look for a place that carried those ooey gooey sticky buns. I found one place and what the heck??? I wanted to ask, “you call those things sticky buns?” So, I was forced to make my own. I must say, I think I did a pretty good job. 🙂 I much prefer them over cinnamon rolls. I will share that recipe with you another time.

Ok, sorry for the long story, but it all leads to this. Sticky buns take time. Making dough is time consuming. The other night, I was eating one of those little Kings Hawaiian Rolls. I like the butter ones. I thought to myself, the flavor of this roll and the consistency of the bread would make the perfect sticky bun. So I give to you, a shortcut sticky bun!!!!!! I must warn you, you will be hooked. Absolutely delicious, sticky, gooey, sweet morsels of heaven. I gotta call Patty and tell her.

These are so easy to put together and so decadent. Trust me on this.

Shortcut Sticky Buns

6-8 rolls
1/2 cup brown sugar
3 Tblsp butter
1/2 cup corn syrup
1 cup pecans (or your favorite nuts) I used almond slices

Heat oven to 350. Butter a pie tin or 8×8 cake pan. Place the rolls in the pan.
Melt the butter and mix in the brown sugar and corn syrup. Pour it over the rolls. Don’t worry, the brown sugar will melt and not be grainy. Top with nuts. Bake for 20 minutes or until goo starts to get bubbly.

In true sticky bun fashion, turn pan over onto a plate, so rolls are now bottom side up. But you don’t have to do this. Just scoop the goo all over the top of the rolls and serve. Be CAREFUL. Sugar is very hot!!!

OHHHHHHHH, you’re gonna love these!!!! I just know it!!


Day 2 Bah Hum Blog….

Hello there. As I said yesterday, I have a little more to add on the subject of recipes not turning out like the blog shows.

There have been times when I have commented on a bloggers site, as to my experience in making their recipes. I do let them know when the appearance is way off or the taste and texture is not as was described. But I always do it in a nice way. After all, we’ve all made things that were just disappointing. It really disappoints me when a blogger doesn’t acknowledge comments. Especially when they flat out ignore a specific question about the recipe. Ohhhhh, that just hisses me off.

With all of that being said, I wanted to share with you a wonderful experience with an awesome blogger. She did a post on brownies. As you all know, I have tried and tweaked lots and lots of brownie recipes (42 to be exact) and have been on the search for the perfect brownie. Well, I made her brownie recipe and I posted some issues that I had experienced. A few other people commented with the same issues. She so graciously replied to EVERYONE. You could tell that  she genuinely cared about her product and the problems we were facing. She mentioned that she may have to make some changes to her recipe. I was blown away when she did just that! She actually took the time to play with her recipe and make some adjustments. She cared! She posted the new recipe, along with the original recipe, just below the new one.

When I had originally posted my issues with the recipe, I did let her know that in no way was I criticizing. Fortunately, she didn’t take it that way. In fact this is what her response was “Don’t feel bad about your comment at all!! I love having people telling me how a recipe turned out for them whether it be good or bad. It just helps me become a better cook myself!”

So cool, right? I can’t wait to try her revised recipe. Her name s Malinda and she has a really cool blog. Please check her out at https://www.countrysidecravings.com/

Ok, gotta go. I have brownies to make!

Oh and always let me know if you have a problem with one of my recipes! Those of you who know me, know that I would most likely come to your house and make it for you! hahahahhaahahahaah.