Lemon Pepper Pork Loin…..

I’m really trying to eat less beef. It’s so hard though, because I just love beef. But I do like chicken, fish and pork too. Pork loins are super quick, easy to prepare and delicious as long as you don’t overcook them. I’ve done my share of that, believe me. Dry pork….blekh…you chew forever, it feels like it’s stuck in your throat, you wanna just spit it out. Oh come on…..you know you’ve been there. That’s why I like these pork loins. Super tender, unless of course you put it in the oven, and go out for a 6 mile run and neglect your pork. Hmm, sorry. I don’t know where that came from since I have never run 6 miles in my life. hahaha.

So, getting back to the recipe…..you can do so much with a pork loin. I have done many versions. But this time I did a Lemon Pepper pork loin (my daughters suggestion). Good idea, Amanda. This is a super simple and quick dinner. Whip up some mashed potatoes and a veggie and you have yourself a great dinner. Oh, and the leftovers make a great sandwich.

porkloin1 porkloin2

porkloin3

Lemon Pepper Pork Loin

2  lb pork loin
1 tblsp olive oil
1 tsp seasoning salt
2 tsp lemon pepper
1/4 tsp garlic powder

Heat oven to 445 deg. Mix together the salt, lemon pepper and garlic powder. Rub the pork loin with the olive oil. Sprinkle with salt mixture, coating the entire porky. Place it on a baking dish and place it in the hot oven. Roast it at this temperature for about 15 minutes. Then reduce the heat to 325 and roast at this temperature for about 15 minutes. Let it rest for about 5 minutes, slice and serve. I like to drizzle the pan juices over the slices.

See? Pretty easy right?

Cereal Cookies…….

Are you a cereal in the morning kind of person? Once in awhile I do like a bowl of cereal for breakfast. But now you can have your cereal in a cookie!! I mean, how great is that!!! If someone asks you “hey what did you eat today?” You can feel good about saying “oh, some cereal.” See? It almost sounds healthy, right? One of my favorite cookies is a good chewy oatmeal cookie. I love the texture. Well, these cookies have a lot of texture. My favorite cereal is Honey Bunches of Oats. I like the one with almond slices. So imagine the texture you get in these cookies with the oat clusters, nuts, raisins and cereal. It makes a great chewy, delicious cookie. I recently made rice krispy cookies and those were delicious too. Hey, I am trying to eat more cereal in my diet. hahahhaha. Cereal cookies are just da bomb. I will post the rice krispy cookies later.

If you want, you can use plain ol cornflakes instead of Honey Bunches of Oats, but you really should try the HBOats.

HBOcookies2 hbocookies3
Do you see all that texture? lots of bumpy lumpy chewy crunchy goodness.

hbocookies4

Cereal Cookies (Honey Bunches of Oats)

1/2 cup butter
1/2 cup shortening
3/4 cup sugar
3/4 cup brown sugar
2 large eggs
1/2 tsp vanilla
1 tsp baking soda
1/2 tsp baking powder
1/2 tsp salt
2 cups all purpose flour
1 cup rolled oats
2 cups Honey Bunches of Oats cereal
1/2 cup raisins (optional)

Cream the butter and shortening together. Add the sugars and beat until nice and fluffy. Add the vanilla and the eggs. Mix thoroughly. Add the flour, salt, baking soda and baking powder. Don’t overmix it…mix briefly only until combined. Stir in the cereal, oats and raisins. Scoop 1/4 cup mounds of dough, 2″ apart, onto a cookie sheet lined with parchment paper. Slightly flatten mounds. Bake at 325 deg, for about 14 minutes, depending on your oven. They should be just slightly browned. Let them cool on the cookie sheet.


A Krispy Kiss……………….

Ok, so I love when you make something that is just so darned fun. Oh, and tasty too! Fun and tasty. We are all familiar with those yummy little chocolate morsels……chocolate kisses. Those cute little foil wrapped morsels of pure yumminess, with those little white slivers of paper peeking out of the top. For some reason, I have always loved carefully peeling away the foil wrapper and popping that chocolate drop right into my mouth.

Well, I love making rice krispy treats into that same fun shape, wrapping them with foil and putting a personalized note on the white strip of paper. But the fun thing is, you can make them huge! Yes…so darned cute and fun. It makes a great gift too! Think of all the notes that you can write to personalize it.  I’m tellin ya, you are going to want to make these for everyone!

Just get a cheap funnel to use as your mold, some thin bargain brand foil paper, print up a tag and make your favorite rice krispie treat recipe. Get started!!! It’s fun!!

krispykiss3  krispykiss2


krispykiss1 krispykiss4

Krispy Kiss 

your favorite recipe for rice krispie treats or mine:

6  cups rice krispies or cocoa krispies cereal
4  tblsp butter
1  tsp vanilla
6  cups marshmallows (set aside 1/2 cup)

1/2 cup Chocolate chips (melt them in the microwave)
1 large funnel (the size of your choice)
Some thin, cheap foil paper
Print a note on some white paper, cut into a strip

Butter the inside of your funnel(s). Melt the butter in a large pan, add 5  1/2 cups marshmallows and stir until melted. Remove from heat and add the vanilla. Stir in the cereal and remaining 1/2 cup of marshmallows. Immediately pack it into your funnels tightly. Let it sit for about 20 minutes. Remove from funnel onto some wax paper. Let it firm up. Melt the chocolate and dip the bottom of your kiss into the chocolate. Place it chocolate side down onto the wax paper and chill until the chocolate sets up. Tear off a piece of foil paper large enough to wrap your kiss. Place your rice krispy kiss in the center of the foil. Bring up the sides of the foil to cover the entire treat and tuck your personal note strip into the top. Squeeze or twist the top shut tight. Gently smooth out the foil around your treat. That’s it! Yay!!

This recipe makes 2 large kisses (5″ high x 5″ across the bottom)

Asian Ginger Garlic Pickled Cucumbers…..

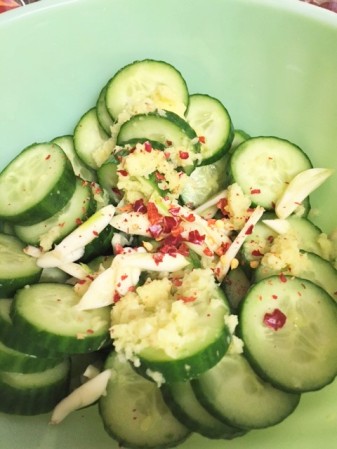
Are you a pickle person? I am not a huge fan, myself. But I do like the Japanese pickled vegetables I grew up on.  Japanese pickles are usually not vinegar based. I am not a huge fan of vinegar pickled veggies.  However,  I do have a recipe I have used for years, that everyone always requested. I kinda forgot about it  until recently. It does have rice vinegar, but they are delicious. You can’t stop eating them…they are so good. They are great on a sandwich, good served with fish, in a salad or just a great snack. My original recipe doesn’t have garlic. But I decided to throw in some garlic this time and I think I like them better this way. Lets make pickles.

asiancucumb1 asiancucumb2

asiancucumb3 asiancucumb4

asiancucumb5 asiancucumb6

asiancucumb7

Asian Ginger Garlic Pickled Cucumbers

4-5 pickling cucumbers (also known as Persian cucumbers, Japanese cucumbers) they are approx. 4-5″ long, skinny, dark green skins
you can also use a Hot house or English cucumber. You don’t want to use a regular salad cucumber. It will get all mushy and who wants a soggy pickle!

1  1/2 tblsp grated fresh ginger
1  1/4 cup of water
3/4 cup of rice vinegar
1  tsp salt
1/2 tsp sugar
4 cloves of garlic, cut in half
1 tsp of crushed red pepper flakes (or more)

In a small saucepan, heat the water to boiling. Remove from heat and add the rice vinegar, sugar and salt. Set aside. Slice the cucumbers into thin slices. Throw them into a good size jar with the garlic halves, crushed red pepper  and the ginger. Pour the vinegar/water mixture over the cucumber mixture. Put the lid on and give it a good shake. Chill for at least an hour, but if you can wait, 2 hours is better. 4 hours is even better!

crunch crunch