Roasted Pepper and Mozzarella Bruschetta……….

The possibilities are endless when it comes to bruschetta. It’s a wonderful snack and great for serving to guests. My favorite is the basic marinated tomato and garlic mixture on top of a crunchy little toasted crostini slice. But I make so many kinds. Another favorite of mine is roasted red bell peppers and garlic, on top of fresh mozzarella cheese, on top of buttery, toasted bread. I used homemade bread today and it was so delicious. The red peppers are cooked slowly until they are caramelized and soft. When you put those peppers on top of the cheese, the cheese starts to get soft and melty. You hungry yet? Then you take that first bite……the crunch of the buttery, toasty bread…..the chewy, melty strings of cheese….and those slightly charred, sweet peppers and that bite of garlic. Holy crap! Doesn’t that sound good? If you want a little tang, drizzle a bit of good balsamic vinegar on top. I sprinkle a bit of crushed chili peppers on mine, since I love some spicy heat.

Oh, and I recommend a good hearty bread, sliced thin. Maybe a ciabatta or sourdough bread. Oh, and a nice glass of wine…like Pinot Grigio, or a crisp Chardonnay, or whatever your favorite is.

redpepperbrusch2 redpepperbrusch3

redpepperbrusch4  redpepperbrusch5

redpepperbrusch6  redpepperbrusch1

Roasted Red Pepper and Mozzarella Bruschetta

slices of a good hearty bread (you can buy the little appetizer pre sliced bread)
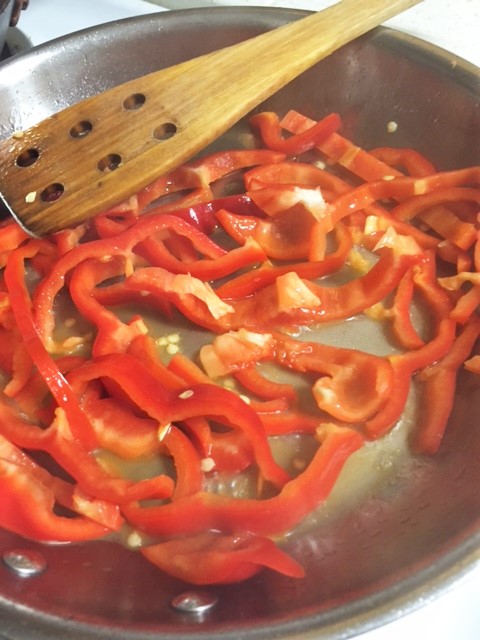
1 fresh red bell pepper, sliced thin
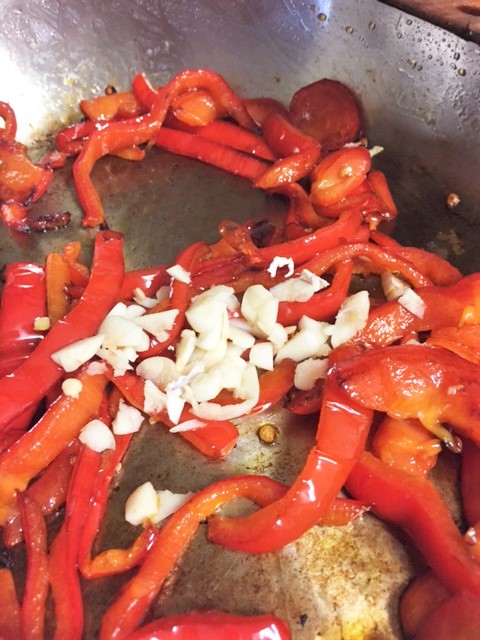
2 fresh cloves of garlic, minced
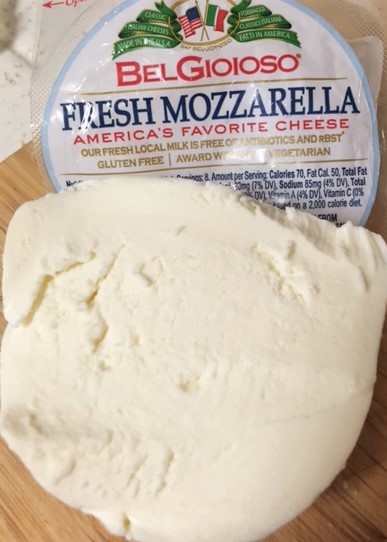
1 ball of mozzarella cheese (I prefer the softness of fresh mozzarella), sliced
Balsamic vinegar for drizzle (optional) or just use salt to taste

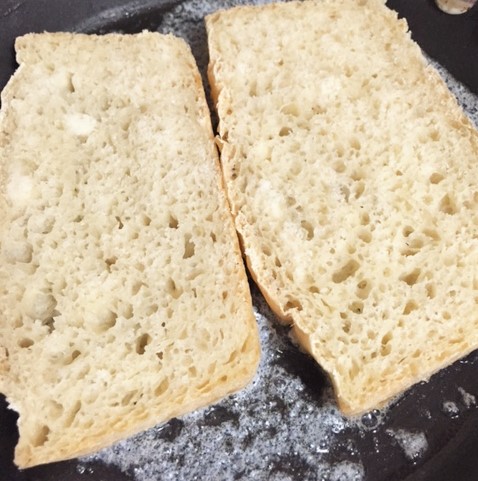
In a skillet, over medium heat, pour a couple of tablespoons of olive or vegetable oil. Dump in the sliced bell peppers. Slowly add 1/4 cup of water. (It will sizzle) Stir the peppers around and allow the water to evaporate. Continue tossing the peppers in the pan, until they are soft and getting a bit charred. Add the minced garlic and keep tossing so your garlic won’t burn. When the peppers are nice and soft, remove from heat. In another skillet, melt some butter, or you can use olive oil. Place bread slices in the butter or oil, top with cheese slices. Top cheese with peppers. Once bread is browned and crispy, remove from heat and onto serving plates. Drizzle with balsamic vinegar and serve.

If you are making these for a crowd, brush butter or olive oil over all your slices of bread and place on a large baking sheet. Place them in the oven at 425 deg. until browned and crunchy. Remove pan from oven, top bread slices with slices of the cheese and top with peppers. The heat from the peppers will slightly melt the cheese.


A Chewy Chocolate Cookie made with Chocolate Spread….

One of my favorite cookie recipes calls for melted chocolate pieces. Well, I didn’t feel like melting chocolate so I decided to use some Hershey’s Chocolate Spread that I had on hand. Have you tried this stuff?? OMG, it is really good stuff. It’s similar to Nutella and I know many of you love Nutella….the chocolate hazelnut spread. I love chocolate and I love hazelnuts, but since for some crazy ass reason, I dislike the word Nutella, I won’t eat the stuff. Those of you who know me and follow my blog, know that I have this crazy word association thing.  Yes, yes…I know it’s weird, but let’s not get into that right now. So, anywayyyyyyy, I used this Hershey’s spread and I am I glad I did.

So, I made the cookies and wow, they are good. This cookie has ground oats  also, so that kinda makes em healthy-ish. They have great chew, they’re rich, chocolatey and wonderful.

hersheyspreadcookie3  hersheyspreadcookie4

hersheyspreadcookie2 hersheyspreadcookie1

hersheyspreadcookie5  hersheyspreadcookie6 hersheyspreadcookie7

Hershey’s Chocolate Spread Cookies

1 cup old-fashioned oats (ground into a powder in the food processor)
¾ cup old-fashioned oats (not ground up)
1 cup all-purpose flour
1/4 teaspoon baking powder
1/2 teaspoon baking soda
1/4 teaspoon salt
1 stick of butter, plus 2 tblsp. (slightly softened)
1 cup packed light brown sugar
1 large egg
1 teaspoon vanilla
3 tblsp Hershey Chocolate spread
1 cup semi sweet chocolate chips
1 cup toasted pecans, chopped (optional)

Directions:

1. Heat oven to 350 degrees. Line baking sheets with parchment paper.

2. Place the 1 cup of ground oats in a bowl and stir in flour, baking powder, baking soda, and salt. Set aside.

3. In a bowl of a stand mixer fitted with paddle attachment, cream butter and brown sugar together, about 1 minute. Add egg, and beat until combined. Add vanilla and chocolate spread and beat until combined. On low speed, add flour mixture and remaining 3/4 cup of un-ground oats, mix to combine. Stir in chocolate chips and pecans.

4. Using a scooper, scoop balls of approx. 3 tablespoons of dough and place 2 inches apart on baking sheets. Bake until cookies are cracked and set on top but still look a bit moist. About 14 minutes. Cool cookies on baking sheets on wire rack.

Bacon and Egg Salad Sandwich………

One of my favorite sandwiches is a basic egg salad. LOVE. I don’t like it with pickle relish, onion…..don’t like it with lettuce. I just want an egg and mayo mix. However, I do occasionally like it with some crumbled bacon. Yep. I used to make bacon and egg deviled eggs and one day I decided to put a couple of deviled eggs on a piece of bread and loved it so much, I started making egg salad with bacon. Good stuff and simple.

baconandeggsalad1 baconandeggsalad2

Bacon and Egg Salad

4  eggs, boiled  and cooled
2  strips of bacon, fried and drained of all grease
1/2 cup mayo +/- depending on how you like it
1/4 tsp black pepper
1 tblsp sour cream (I always add this to my egg salads)
fresh jalapeno, minced (optional)

Chop your eggs and bacon up and combine in a bowl with the mayo, black pepper and sour cream. Chill until nice and cold. Serve on your favorite bread.


Quick and Easy 2 ingredient Frosting……..

Two ingredients!! You gotta be asking how a frosting can only have two ingredients, right?  No? Not impressed? Not curious? Aww, come on. You don’t even need a mixer! Now, are you curious? This stuff is WOW. When I first tasted it, I shouted out a loud HOLY S*#T!!!! But it was meant in the best way. 🙂

You are going to want to just shove a big ol spoonful of this stuff in your mouth. It’s that good. So, I have used this frosting for chocolate cake, vanilla cake, strawberry cake…..I’ve even dipped some strawberries in it. It’s all good.

Oh, I should tell you…..this frosting sets up best in the refrigerator, so it’s best for a baking dish type cake….like a 9×13 or 9×9. Just spread the frosting all over your cooled cake and throw it in the fridge. I tried it on cupcakes and it works ok, but you can’t get much frosting on the cupcake without some of it spreading down the sides. But if you really want to  use it for cupcakes, I would chill the frosting first and then frost the cupcakes. But then, chill them again before serving. Make sense?

Ok, you’re going to be able to whip this stuff up faster than it took you to read this post.

marshyfrosting1 marshyfrosting2

marshyfrosting3  marshyfrosting4

Easy Fluffy Marshy Frosting

1  8oz container of Cool Whip, thawed
1 tub Marshmallow Cream/Fluff

Soften the marshmallow cream in the microwave for 15 seconds. Dump the marshmallow cream and the cool whip in a bowl. Whisk it together until smooth and combined. Spread it on a cooled cake and chill. That’s it!

The cake pictured, is my Wacky Cake:

Wacky Cake 

1 1/2 cups all-purpose flour
1 cup white sugar
1/2 teaspoon salt
1 teaspoon baking soda
1/4 cup cocoa powder
6 tablespoons vegetable oil
1 tablespoon white vinegar
1 cup water

Preheat oven to 350. In a square 8×8 baking dish, put all the dry ingredients. Add the oil, vinegar and the water. Stir it up, but don’t over mix. Everyone over mixes…….GEESH. don’t do it.
Bake for approx. 25 minutes or until you poke a toothpick in it and it comes out clean. Let it cool completely.


Garlic Butter Fried Rice (Like Benihana)….

What is it about garlic and butter together? It smells so amazing, it tastes so good. What a great combination. Traditionally, Japanese cooking does not include a great deal of garlic. But there is a popular Japanese restaurant that makes this amazing fried rice, using lots and lots of garlic butter. Oh, I think I just drooled a bit. M-mmmmm. If you have been to a Benihana restaurant, you know exactly what I am talking about. But if you haven’t been to a Benihana, you don’t have to go! Stay home and make it!

Now, I love fried rice. I have several different kinds that I make. I tend to stick with my basic fried rice that I grew up on. I have kinda resisted making this version with the garlic, because I felt that I was going against tradition. My mother would never eat fried rice with garlic! I can just hear her now…..”ohh, Japanese no put the gahlic”. 🙂 But something tells me she would like this. I always put bean sprouts, egg and green onion. Sometimes I add green beans, sometimes I don’t. Put the veggies you like. It’s really good with chicken too.

If you haven’t been to a Benihana and have not had garlic butter fried rice, you are in for a treat.

BHfriedrice1 BHfriedrice2

BHfriedrice3 BHfriedrice4

Garlic Butter Fried Rice

Serves 2(as a main dish)

3 cups  cooked cold rice
2 green onions, Sliced
1 handful bean sprouts (optional)
1 cup fresh raw green beans, chopped (optional)
1 scrambled egg (optional)

Garlic Butter:

1/4 cup softened butter
4 cloves of fresh garlic, minced
2 tblsp soy sauce

In a small bowl, mix together the 1/4 cup of butter and 4 cloves of minced garlic. Add the 2 tblsp of soy sauce and mix. Set aside.

In a large skillet or wok, add a  couple tablespoons of oil.  Throw in the green beans and toss around for a couple of minutes. Add the bean sprouts, green onion and sprouts. Stir in the garlic butter. Add rice, salt and pepper. Toss all together until well combined.