Cheesy Chicken Wontons….

I have made oh so many kinds of wontons in my 29 years….(chuckle).  I have even made fruit wontons. Oh yes, try that…..so good, like a hot fried hand pie but smaller and easier to eat. I will post those very soon. But for now, I think you ought to make these wonderful,  melty cheesy chicken won tons. Then you dunk em in some sour cream and salsa. Then you scream HOTTTT, cuz you couldn’t wait and you took a bite before they cooled off a bit. Then you have a few blisters on your tongue and talk funny for a while.

Now, I used chicken (thus the name Cheesy Chicken wontons, but you don’t have to use chicken. You can just use cheese! I used Monterey jack cheese but they are great with cheddar too. Since I did use a light-colored cheese, the pictures don’t really show how cheesy these are. But, trust me. They are.  Yum-mm-m.  So, get creative and have fun coming up with your own creation! If you do, let me know about it!

chickencheesewontons6

chickencheesewontons5   chickencheesewontons4
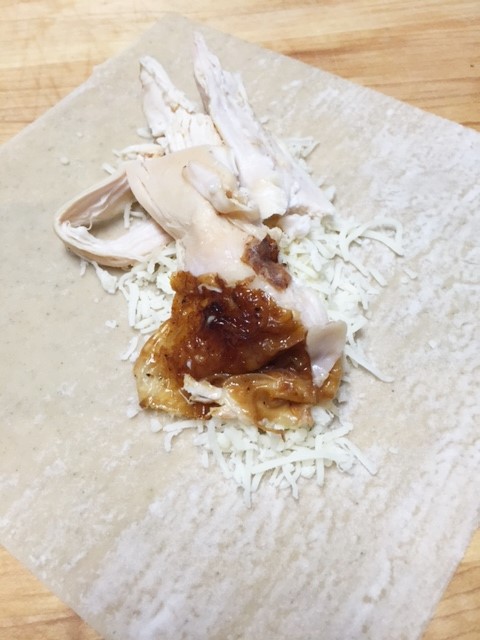
that’s a little chicken skin you see there….


chickencheesewontons3 chickencheesewontons2

Cheesy Chicken Won Tons

I am not including exact measurements. It depends on how many you plan to make and your preferred cheese to chicken ratio. I made 6 large wontons.

– 1 package  won ton or egg roll wrappers (I used the large ones, but the smaller size works too)
– shredded, cooked chicken, seasoned with salt and pepper (I used 1 breast for 6 large wontons)
– approx. 1 cup shredded cheese of your choice (I used Monterey Jack)

Ready to roll? hahaha, get it? roll? Sorry.

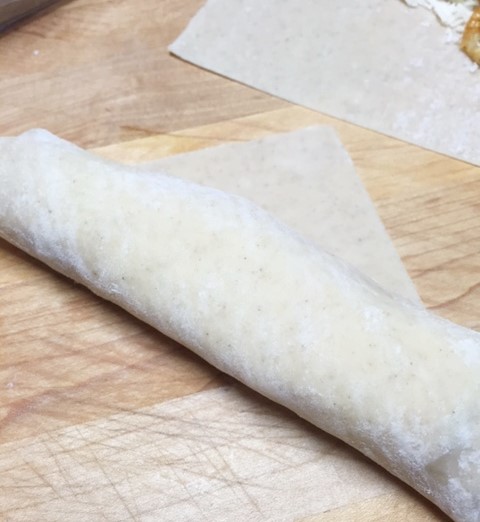
Place your wrappers out flat, so you have one corner facing down and the opposite corner at the top. Keep the rest of the package covered or they will dry out quickly. Place chicken and cheese slightly lower than the center of the wonton wrapper. You could add a jalapeno slice also if you like heat. I do!! Bring the left and right corners to the center. Bring the bottom up, enough to cover the filling and roll up towards the top. Wet the top corner and continue rolling until the moistened top corner is sticking to the roll. Ok, frying time.

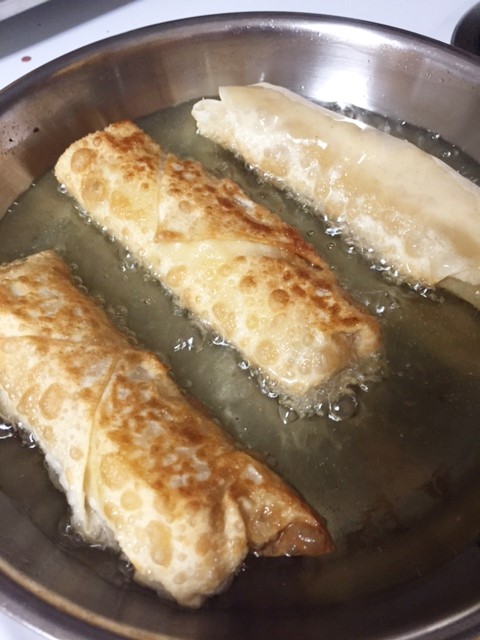
Pour approximately 1 inch of vegetable or corn oil, into a heavy skillet. Turn heat to medium/medium high. Fry and flip until both sides are nice and brown. Remember, the filling is cooked so, don’t over fry.

Drain on paper towels.  Don’t try to bite into them too soon. They are very hot!

Now, let’s make the ever so easy sauce.

Dipping Sauce

1 cup of sour cream
1/2 cup salsa of your choice

Mix the 2 together and that’s it! Easy right?

These are very similar to a chimichanga, so they would be good with some guacamole too.


3 Berry Pie………………..

I don’t make a lot of pies. I don’t really like pie crust and I never could seem to get the hang of making a good crust. But recently I watched one of my favorite movies. I may have watched it like 2 or 10 times. It’s cutesy, sweet and full of pie…pronounced PAHH. The movie is called Waitress. It’s a story about a young waitress, in an unhappy relationship, who makes pahhs. She has all these cute names for her pies, depending on what’s going on in her life. It’s really cute and well, her pies made me wanna make a pie. I even made the crust! But I have been known to use a store bought crust. This pie has blackberries, raspberries and blueberries. So let’s see, I should give my pie a name,  like she did in the movie.  Let’s call it my Watching a movie for the 10th time 3 berry pie. I say that with a southern accent. (I love southern accents)

I used a combination of frozen and fresh berries. I’ve made this pie using sugar and I’ve made it using Splenda. It’s good either way. So, go get some berries and make a pahh. Don’t forget to give it a cute name.

Here are some of the names of the pies in the movie:

I DON’T WANT EARL’S BABY PIE
I HATE MY HUSBAND PIE
BABY SCREAMING IT’S HEAD OFF IN THE MIDDLE OF THE NIGHT AND RUINING MY LIFE PIE
I CAN’T HAVE NO AFFAIR BECAUSE IT’S WRONG AND I DON’T WANT EARL TO KILL ME PIE
PREGNANT MISERABLE SELF PITYING LOSER PIE

Ok, on to mah pah…

blackberrypie1 blackberrypie2

blackberrypie4

blackberrypie3

3 Berry Pie

Crust: (makes 2 crusts)

3/4 cup cold shortening
2  1/4 cup flour
1/2 cup ice-cold water

Using a fork, cut the shortening and flour together until you have course crumbs. Add the cold water a little bit at a time and mix just until it comes together. YOU MAY NOT USE ALL OF THE WATER. You don’t want a really wet dough. Form it into a ball and chill for about 20 minutes or so. Cut the dough in half and either save one half for another pie, or use it as a top crust, to cover your pie. Roll the crust out on a floured surface until its nice and smooth and flat and gently place it in your pie plate. Set aside while you are preparing the filling.

Filling:

5 – 6 cups of fresh or frozen berries (blue, black and raspberry)
3/4 cup sugar
juice of half a lemon
3 tblsp flour

Preheat oven to 365 deg.

Mix together the sugar and flour. Gently mix the sugar and flour with the berries and add the lemon juice. Dump that mixture into the unbaked pie shell. At this point, you can bake it as is, without a top crust, or you can place the other crust on top. Crimp the edges of the top and bottom crust together and make a couple of slits on top of the pie crust to allow steam to escape. Bake for 35- 40 minutes until the crust is golden brown. Allow to set for a couple of hours and serve warm or chill it. Either way is good.

Serve with our without ice cream.

Orange Iced Tea……………….

We are having some warm days here in Southern California. I am not happy about it either. I much prefer cooler weather. But when it’s hot like this, there is nothing that I like better than iced tea. A big glass of it, with lots of ice. Come to think of it, I love iced tea anytime…..cold weather, hot weather, I love the stuff.  I usually don’t like flavored teas though. But I love orange iced tea. Have you ever tried it? No? Well, I highly recommend it. It’s refreshing and you get the sweetness of the orange, so you don’t even have to add any sweetener to it. But if you like your tea sweet, you can make some orange simple syrup.  Holy moly it’s good stuff.

So, summer is here, it’s getting hot and iced tea is the perfect summer time thirst quencher. You will be making pitcher after pitcher of this stuff.

orangetea1 orangetea2

orangetea3 orangete4

Orange Iced Tea

8 cups of good drinking water
3  large cold brew tea bags
1  large orange

Fill a large pitcher or jar with the water.  Add the tea bags and allow to steep for a couple of hours. **
Slice the orange into thin slices and plop them into your tea. With a wooden spoon, just give the orange slices a bit of a smash to release the juices. Chill the tea for at least a couple of hours, so the flavors of the tea and the orange come together. Pour over ice and enjoy. If you like your tea really sweet, add some orange simple syrup. (recipe below)

** If you don’t have cold brew tea bags, you can use 6 regular tea bags and let the tea steep in 8 cups of hot water until the tea is as strong as you like it. Then add your orange slices.

Orange Simple Syrup

Simple syrup is a mixture of 1 part liquid to 1 part sugar. It’s heated until the sugar is all dissolved. It’s used to sweeten drinks instead of sugar, since there are no gritty sugar granules in your drink. You can add all kinds of flavorings to them. (fruit zest, vanilla, chile peppers, cinnamon, etc)

2 cups of water, or 1  cup fresh squeezed orange juice and 1 cup water
2 cups of sugar
zest of 1 orange

In a medium sized sauce pan, add the water, orange juice, orange zest and sugar. Heat just long enough for the sugar to dissolve.  Allow to sit out and come to room temperature. Pour it through a strainer, into a container. If you don’t mind the bits of zest, you don’t have to pour it through a strainer. Keep refrigerated. Use it to sweeten your iced tea and many other beverages.


Easy Skillet Cheesy Chicken Broccoli Rice……

This dish is a variation of a popular potluck favorite. I think we are all familiar with the  cheesy broccoli rice casserole. It has been out there for so long.  The one I made here, has chicken in it.  It’s a super quick and easy skillet version and it’s another one of those comfort dishes.

It may not look really cheesy, but that is because I used a combination of Monterey jack cheese as well as cheddar cheese. But you can use any of your favorite cheeses.  If you are a vegetarian, this is good without the chicken. You could even use mushrooms! In fact, I love mushrooms and actually prefer it instead of chicken in this dish. So, there you go….yummy, comforting, goodness. Now, go make it.

Sorry for the lack of pictures. I was so hungry, I was in a hurry to get this cooking. Hahahahah.


broccRice

Skillet Cheesy Chicken Rice

1/2 cup finely diced onion
1  pound of boneless chicken thighs or chicken breast cut up in bite size pieces
2 cloves finely minced garlic
1 cup of uncooked long grain rice
2 cups broccoli, cut in pieces
2 cups chicken broth
1/2 cup wine (or you could just use water or more chicken broth)
2 cups of a mixture of shredded cheddar and Monterey jack  cheese

In a large skillet, with a bit of oil, brown the chicken pieces and the onion over medium heat. Add the garlic and the uncooked rice. Stir it around for for about a minute. Add the broth and wine. Allow to cook until it starts to boil. Reduce heat to a slow simmer and cover pan. Cook for about 14 minutes. Remove lid and sprinkle the broccoli on top.  Put the lid back on and continue to simmer 8-10 minutes or until rice and broccoli are tender, but not mushy.  Stir in about 1 cup of the cheese. Sprinkle the remaining cheese on top and cover with lid, allowing the cheese to melt.

Note:  If you are serving this to vegetarians, just leave out the chicken entirely and use vegetable stock. You can always cook the chicken separately and serve the rice as a side dish to the chicken.

Don’t like broccoli? Use cauliflower or green beans.
Want a little Mexican flavor? Add some taco seasoning or salsa when you are adding the broth.

Potato Chippers………….

Ok, so just hear me out. We all love potato chips, right? Ever had a potato chip cookie? I know it doesn’t sound very good, but these cookies are da’bomb. My mom used to make these cookies often. It was a family favorite. Don’t wrinkle your nose and say yuck….just take my word for it…. these are soooo, so good. They are chewy, crispy, buttery, sweet, but just enough salty too. No, they don’t taste like potatoes. You really can’t even tell there are potato chips in them, unless you actually see any bigger pieces of chips. But that actually makes for a good conversation piece. It really is one of my favorite cookies……and I love cookies. I know once you make these, you will make them again and again. They are good with some chocolate chips too, but I prefer them without. But that’s just me. You could even dip them into some melted chocolate and let the chocolate set up.

I don’t even use a mixer for these.  I just mix the dough up with a wooden spoon in a big ol bowl. But feel free to use your mixer.

potatochipcookie2


potatochipcookie3

potatochipcookie1

Potato Chip Cookies (Potato Chippers)

1/4 c (half of a stick) softened butter
1/4 cup butter flavored shortening (you can use butter, but trust me…it’s better to use the 1/4 cup of shortening)
1/4 cup brown sugar
1/2 cup white granulated sugar
1 egg
1 cup flour
1/2 tsp baking soda
1/2 cup crushed potato chips (not too crushed……don’t smash em to death)

Preheat oven to 370 deg. In a large mixing bowl, using a sturdy wooden spoon, mix together the butter, shortening, brown sugar and white sugar. Mix until it’s nice and smooth. Add the egg and mix well, until thoroughly combined. Add the flour and baking soda. Stir until combined. Gently stir in the potato chips. Place large scoops of dough  (approx. 1/4 cup), onto an ungreased baking sheet, 2″ apart. Pat a few potato chip crumbs on top of the dough scoops. Bake for 10-12 minutes until light golden brown. I bake mine for 11 minutes. Allow to cool on the baking sheet. Cookies will be chewy and crisp when set.

Enjoy your chips.