The BEST Oh-so-Sweet Potatoes…..

I am a huge fan of sweet potatoes. I love them just baked plain, with nothing on them. I like them candied, fried…..in pie….in rolls…..any which way. Sweet potatoes are my favorite Thanksgiving dish.

For years and years, I made them the way my mom made them. But I got a bit bored with them. Then I made them mashed with sweet, crumbly stuff on top. Then I made them with homemade marshmallows….YUM!!!!!!!

But of all the ways I have ever had them, this is my most favorite. I didn’t even put marshmallows, can you believe it? It just doesn’t need it. You could certainly add them, but they would be just too sweet I think. Hey….you do whatever you want. But maybe just have a bowl of melty, toasty marshmallows on the side. That way you and your guests can add a dollop on top if you want it. I simply line a baking sheet with some parchment or foil. Throw your marshmallows on there and bake at 425 for just a few minutes. Watch them carefully! Or, sometimes I just torch them. Then, just scrape them off the baking sheet, into a bowl. It’s a great cake topper too.

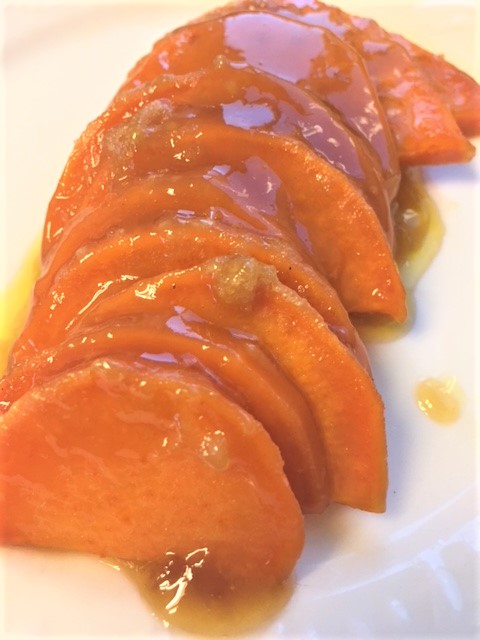
Ok, now back to my taters…..These potatoes are so buttery rich. The sauce is very caramel like and amazing. Seriously, you will fall in love with these, I kid you not. With each bite, you will be moaning or saying SO GOOD. Oh, and they are really good cold the next day. That’s if you have any left!


The Best Oh-So-Sweet Potatoes

The topping ingredient amounts are for 1 large sweet potato that will feed 3.

1  large sweet potato
1  Tblsp butter, melted
1/2 Tblsp olive, canola or vegetable oil

Topping:

3/4 cup brown sugar
2 Tblsp granulated sugar
2 Tblsp flour
3 Tblsp butter, melted
1 tsp vanilla

Heat oven to 375.

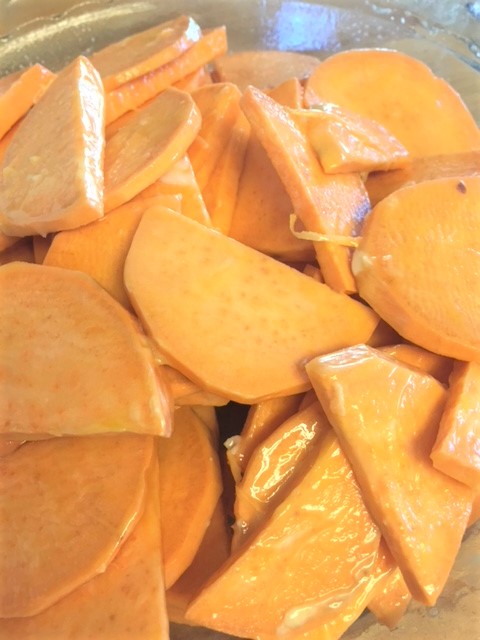
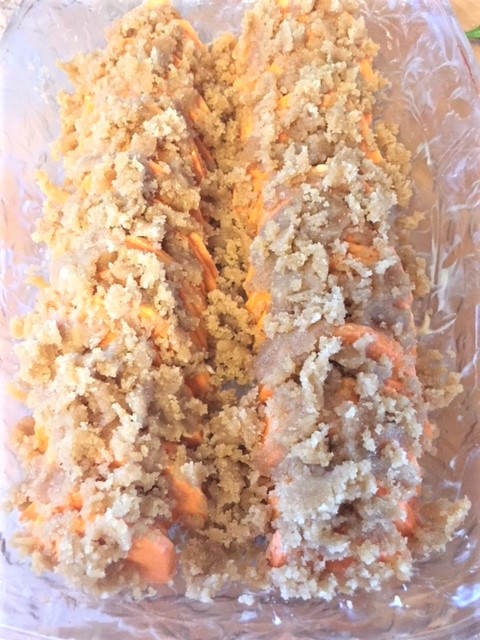
Slice peeled potatoes almost 1/4″ thick. Cut the slices in half. Toss them with the 1 Tblsp butter and 1/2 Tblsp oil. Line the slices of potatoes up in a baking dish.

For the topping, in a bowl, using a fork….mix together the sugars, flour, melted butter and vanilla. Sprinkle it over the potato slices, gently patting it down on the slices. Bake for approx. 30-35 minutes. I did 30 minutes and the potatoes were perfect and not mushy.

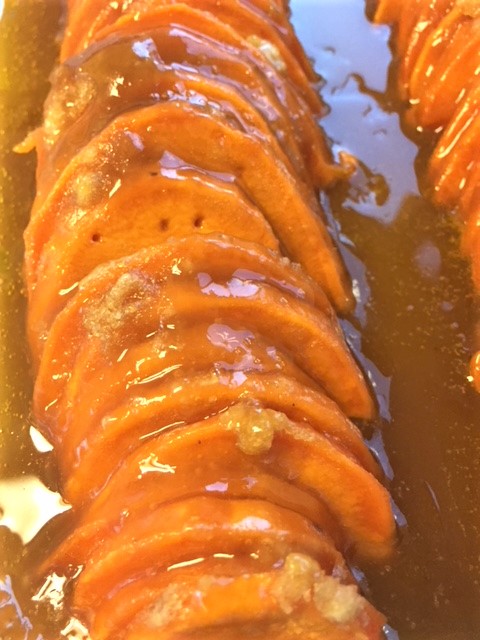
Remove from oven and spoon some of the melted goo all over the potatoes. Be careful, as sugar is scorching hot when heated and it can burn your mouth if you get too anxious. I wouldn’t know anything about that. 😦 ouch.

Seriously, these are amazing.


Caramel Apple No Bake Cheesecake in a jar……

It’s the season of apples. It seems like everyone loves apple pie, apple cider, apple dumplings, caramel apples, etc. I wanted to make a special birthday treat, so I decided on a caramel apple no bake cheesecake. Since it was for a birthday, I wanted it to be special so I decided to do it parfait style….a special dessert for one. A nice jar, filled with layers of cookie crumb crust, cheesecake filling and caramel apple filling. You could very well do this in a pie pan or cake pan, but I like seeing the layers. Oh and this works great with any fruit filling.

You could do several little jars for your holiday desserts and attach a little spoon with some ribbon around the jar. What a sweet little treat for everyone.

Let’s get started.


Caramel Apple No Bake Cheesecake in a Jar
Makes enough for 6 individual desserts

Apple Filling:
2 green apples, sliced or chopped (I leave the skin on for tartness)
1  cup  light brown sugar
2 Tblsp butter
1/2 tsp cinnamon
2 Tblsp water
4 Tblsp heavy cream

In a sauce pan, stir together the apples, brown sugar, butter, cinnamon and water. Cook over medium heat, stirring it occasionally, until the apples are the consistency you like. Add the heavy cream and continue to cook until it thickens a bit. Remove from heat and allow to cool completely. I place it in the refrigerator to cool.

While the apple filling is chilling, prepare the cheesecake filling.

Cheesecake Filling:
2 blocks cream cheese (8 oz) very soft
1/4 cup + 1 Tblsp powdered sugar
1 tsp vanilla
4 Tblsp heavy cream

In a mixing bowl, whip the cream cheese until nice and creamy and smooth. Add the vanilla and powdered sugar. Mix well. Add the heavy cream and mix for 1 minute. I fill a piping bag with the filling. It’s much easier to layer this way. If you don’t have a piping bag, just fill a large zip lock bag and cut off one corner of the bag. Squeeze the filling through the hole in the bag.

Crust:
2 cups cookie crumbs (graham crackers, shortbread, etc)
Just take your favorite crunchy cookie and smash the heck out of  them.

Let the layering begin!!!

In a nice glass or jar, start the layering process, starting with the crumbs. Then comes the cheesecake filling and then the fruit. Repeat. Cover and chill.

If you don’t want to mess with all the individual jars, just put it all together in a serving dish…..crust on the bottom, cheesecake filling and then the fruit topping.


Blackberry Cake….

I’m crazy about blackberries. I love to snack on them, smoosh them up and put them on ice cream and I love fresh blackberry margaritas.

Last week I was looking at a recipe on line and noticed a picture off to the side, of a slice of  purple cake. I had to find out what it was! It was just so pretty. Well, it was blackberry cake with cream cheese frosting. OMG! The site was Serious Eats. I knew that I had to make this cake right away. Well, I did make a few adjustments and made it.

This is a single layer cake. It doesn’t rise much. It’s good. But I have to say, it was better the second day. It was much more blackberry-ish. It doesn’t have a real intense flavor, but it’s there.  I do recommend frosting this cake lightly. Cream cheese frosting is pretty heavy and rich and you won’t want to take away from the flavor of the cake. The frosting is not the star of this show.

I did puree some extra berries to pour on top of the cake . Wow, I’m so glad I did. Amazing. It looks so pretty too.


Blackberry Cake

1/2 cup butter, softened
3/4 cup sugar|
1  1/4 tsp. baking powder
1/8 tsp baking soda
2 egg whites
1 1/4 cup cake flour
1/8 tsp salt
1/2 tsp vanilla
1  1/4 cup fresh blackberries

Heat oven to 350. Spray an 8″  cake pan with a non stick cooking spray. Place a piece of parchment paper on the bottom of the pan. Spray that too.

Smash the berries into a puree. You should have about 3/4 cup of puree. I left mind a bit chunky.

In a large bowl of a stand mixer, at medium speed, mix together the butter, baking powder, baking soda, salt and sugar until fluffy. Add the egg whites one at a time. Reduce speed to low. Mix in half of the cake flour and then the blackberry puree. Mix in remaining cake flour, until you no longer see any flour specks. Pour into prepared pan.

Bake for 25 – 30 minutes. Check the cake for doneness at 25 minutes, by sticking a toothpick in the center. It should come out clean. Allow to cool for about 45 minutes. Run a knife around the edge of the pan to loosen the cake. Remove from pan, onto a plate. Allow to cool completely.  Frost. Top with berries or puree some berries to pour on top.

Frosting

4 oz of softened cream cheese
1/4 cup of softened butter
2 cups of powdered sugar

With a mixer, mix together the cream cheese and butter until creamy and smooth. Add the powdered sugar and mix well until creamy and smooth.

The only Pumpkin Bread I Like. Holiday Recipe #1

Well, here we are into October. Unbelievable. Can you believe the holidays are just around the corner? You know what that means! It’s time to get out the holiday recipes! Yay! I absolutely love holiday baking. So-oooo,  here is holiday recipe #1………Pumpkin Bread.

Every Christmas we’re all given those cute little pumpkin breads, all wrapped beautifully and tied with ribbon. While I so appreciate the thought….and I really do, I always compare it to my recipe. I just cant help it. There really isn’t a pumpkin bread out there that I have ever liked, except for mine. I’m sure you’re all saying to yourself, “how different can pumpkin bread be?!”  I know that everyone has their favorite recipe. There are so many variations. Once in a while I will buy a slice from Starbucks.  It’s ok, but it has a certain spice that I am just not fond of. Maybe nutmeg…..ewwwwww…..yuck.

Let me tell you the story behind my recipe. Many years ago a coworker brought me some of her pumpkin bread. I repeatedly told her that I didn’t like pumpkin bread. She insisted that I try it. I promised her that I would try it “later”. Ok, so the truth is, I discreetly dumped it in the kitchen trash. I know, I know……so bad right? Well, later she asked me how I liked it.  I said “ohhh, so is that a secret family recipe?” She said “yes, I will bring you the recipe and bake you a loaf”. Uh-oh.

So, the next day, there was a beautifully wrapped loaf of this beautiful pumpkin bread, tied with ribbon, sitting on my desk. Attached, was the recipe written on a sheet of steno pad paper. I still have that piece of paper….and you can tell that I have used that recipe many times. Anyway, I didn’t feel right about tossing that gift she made me, so I took it home and sliced it up. My back then hubby, kept eating it and eating it. I kept hearing “Mmm-m-m-m”. So I gave it a try. It was so darned good. I have been making it ever since. It’s not overly spiced and it’s extremely moist. There is just so much flavor.

I have friends who don’t care for pumpkin bread and I told them the story of how I came to like it, so they agreed to try it. Now they request a loaf every holiday season.

I happen to like raisins in some baked goods. I do use them in this bread. But if you are not a fan of raisins, just leave them out.


you can see how moist this bread is. It’s making my mouth water..


I usually don’t top the batter with pumpkin seeds, but it is a great combo, so…….

The Best Pumpkin Bread

1 cup brown sugar
1/2 cup sugar
1 cup canned pumpkin
1/2 cup vegetable oil
2 large eggs
2 cups all purpose flour
1 tsp baking soda
1/2 tsp of each: salt, cinnamon
1/4 tsp ginger
1 cup raisins – optional
1/2 cup walnuts, chopped
1/4 cup water

Heat oven to 350.

In a large mixing bowl, combine the sugars, eggs, oil and pumpkin. Beat until well blended. Mix in the flour, baking soda, salt and spices. Add water and mix well, but not too much. Stir in the raisins and nuts.

Pour into a well oiled loaf pan. Bake for 50 – 65 minutes, depending on your oven. Stick a skewer in the center and if it comes out clean, its done. Allow to cool for about 20 minutes and then remove from pan.

I like mine slightly warm with some butter. But it’s delicious just plain, as well. Perfect with a hot cup of tea.


Kimchee…………….

I remember there was a time when everyone wrinkled their nose when I would mention kimchee. Now, it’s so popular and I see it everywhere. Recently, I even noticed that a local burger joint had a kimchee topped burger on its menu.  This weekend on the Food channel, there was a bloody mary profiled, that had kimchee in it. YUM.

In case you don’t know what it is, it’s a Korean side dish made with lots of salt, cabbage and red pepper flakes that are finely ground. It also contains lots of garlic. Of course there are variations using cucumbers (my fave), onions, radish, etc. It becomes pickled/fermented by all of the salt. It’s served with almost every Korean meal……kinda like a little salad or garnish.

I love to add it to my ramen bowls, or fried rice. Kimchee fried rice is delicious too. Oh, and how about some teriyaki beef or chicken tacos with chopped kimchee as a garnish instead of the traditional lettuce. If you haven’t tried kimchee, I hope you will. It’s really good. I love it so much. I remember when I was growing up, my mom and I would stay up late watching a Japanese movie. She would fix us each a bowl of rice with hot green tea poured over it and some kimchee drizzled with soy sauce, on the side. It is to this day, still one of my favorite comfort foods.

Just a note…..might wanna have some mints close by. Hahahahah, you will definitely have garlic breath.


Kimchee

1 large (or 2 medium) bunch of Napa cabbage
6 -7 cloves of fresh garlic, grated or minced very fine
1/2 cup sea salt
5 green onions, sliced
1 Tblsp fresh grated ginger
4 cups water
3/4 cup Korean pepper powder (found in Asian markets)

Chop napa cabbage into large pieces. Place them in a large bowl. Sprinkle with the sea salt. Pour the water over the cabbage and give it a good toss. Let it sit like that for an hour and a half, tossing once in awhile.

In another bowl, mix together the pepper powder, ginger, garlic and green onions. Pour in 1 cup of water and mix everything together. Set aside.

After the cabbage has set for an hour and a half, drain the water off. Rinse the cabbage twice and drain well. Add the red pepper mixture and mix well. Dump it all into an airtight container or jar. Allow to set out on the counter for an entire day. The salt content will ferment your cabbage. After a day, place it in the refrigerator for at least a day, but I always wait 2-3 days. Give it a good shake and eat it up!